Registration of a personal account on the website lk.fss.ru for individuals
Login to the FSS account of the recipient of insurance services is currently performed using user identification in the UAIS State Services. It is to the authorization form of this site that the transition occurs after activating the “Account Login” service for the insured.
To register on the State Services portal, you can use one of the many ways, including contacting the following companies and institutions:
- Post office;
- Rostelecom;
- MFC, etc.
In addition, registration is available directly on the UAIS website, which takes place at https://esia.gosuslugi.ru/registration/ by filling out the following form.
Who can be a representative and what powers can be delegated to him?
The representative must:
- have full legal capacity;
- reach adulthood.
As for other restrictions or special requirements, the legislation does not provide for them. Accordingly, an individual entrepreneur can issue a power of attorney to any individual or legal entity who has the right to engage in representation. The organization has the right to issue a power of attorney to an employee or another organization whose charter allows for representation, as well as to any individual.
As for delegated powers, their list is indicated based on what actions the representative in the FSS will perform. This includes the opportunity to represent the interests of the principal, receive, get acquainted with, make corrections and certify copies of the organization’s documents, submit reports, submit applications for the payment of benefits, receive documents about decisions on the payment of benefits, etc.
Login to the personal account of the FSS of the insured
After receiving a login, which is usually the user’s e-mail, phone number or SNILS, and a password, which is created independently and sent to the UAIS State Services, you can begin authorization in the insured’s personal account. To do this you need to do the following:
- go to the above address of the Internet portal of the FSS of the Russian Federation;
- activate the “Account Login” service for a person insured by the employer;
- select one of the identification methods in the UAIS State Services and enter the necessary personal data.
The UAIS provides for the use of the phone number or e-mail of the insured person as a login in the first case, and SNILS in the second. You must also indicate the password received during the registration procedure on the State Services website.
How to apply for benefits
To apply for benefits, a doctor at a medical institution must log into the Social Insurance Fund system and generate a sick leave certificate. This is done by entering the necessary information or copying data from the electronic medical record. Additionally, a unique EBL number is requested. The generated sheet is uploaded to the Social Insurance Unified Insurance System.
When issuing a document, the doctor and medical institution certify it with a qualified electronic signature. An employee of an organization receives only a unique sick leave number, which is used by the employer, the Social Insurance Fund and the medical institution. The number is transferred to the accounting department for calculating benefits.
Filling out a sick leave certificate in your personal account
Using the identification number, the accountant will find the sick leave certificate in the system, and the data obtained from it is used to record and calculate sickness benefits. After this, the accountant fills in the necessary data:
- Name of the organization;
- earnings;
- experience;
- position, etc.
The completed sick leave certificate is certified by a qualified electronic signature of the organization, and if a new digital signature key certificate is used, it must first be registered in the system.
Insured Account Settings
After authorization in the system, the services page of the personal account of the recipient of social insurance services opens. Its interface allows you to use almost the full functionality of the Internet portal.
Typically, work in the system begins with setting up an account for the insured person. It requires activating the “Personal Data” section of the additional menu, which allows you to open a page with personal information about the user. These include:
- basic information about the recipient of insurance services - full name, gender, year, day and month of birth, SNILS;
- details of identity documents;
- if available, information about disability;
- information on the insured person located in the Pension Fund databases;
- contact details – address, e-mail, phone number.
The source of information about the insured person is the Social Insurance Fund database. Therefore, to correct the above data, a personal application to the regional division of the fund is required.
Rules for issuing a power of attorney in the FSS
There is no need to follow any special rules when drawing up a document. They are standard for similar documentation. The document must contain a header, a body and an ending. Information can be entered not only by hand, but also using a computer. As already mentioned, many companies use special forms for this. But a power of attorney drawn up on a simple piece of paper is also considered valid.
The principal has the right to indicate any information related to this power of attorney. At the same time, you should avoid vague information and wording. You need to try to avoid mistakes. They can be so rude that FSS employees recognize the document as invalid. As for the seal, today companies can work without them, so a stamp in the power of attorney is not necessary.
A trust document is drawn up in one copy. It is handed over to an authorized person. After the power of attorney expires, the representative is obliged to return the power of attorney to the head of the company.
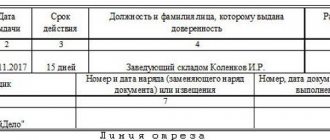
Contents of the power of attorney
As for the content, it is logical to assume that all important information must be present here. The power of attorney must indicate not only the essence of its execution, but also detailed information about the participants in the transaction. So, first the so-called “cap” must be filled out. This includes not only the title of the document, but also the place and date of its preparation. Below is the main part, which is considered to be as detailed as possible. The following information is entered here:
- information about the principal party. The full name of the organization, its organizational and legal form, and information about the constituent documents are noted. The full name and other information of the director, who is the initiator of drawing up such a power of attorney, is also written down;
- information about why a power of attorney is needed. If it is compiled by the Social Insurance Fund, you can indicate which specific structural unit will be submitted to;
- It would be useful to specify on what basis the director issues this power of attorney. It can be noted according to which documents he holds this leadership position;
- Next comes the personalization of the confidant. Not only his full name, but also other passport details are indicated here. Since this is often an employee of the company, it is necessary to indicate the position he occupies;
- a list of actions for which the representative has permission. Usually, if an employee is vested with some kind of authority, it is not just receiving documents. It is possible that upon receipt you will have to sign some documentation. This must also be written down. If a representative is vested with several powers, each of them should be indicated in a separate paragraph. This way, the person to whom the power of attorney will be presented will be able to quickly find the necessary information;
- mark the information about the period during which the authorized person will be able to use this document;
- It would not be out of place to indicate that the representative is deprived of the opportunity to draw up a transfer of power. If he is endowed with such powers, it should be written: “With the right of subrogation.”
Then comes the final part. It must include the signatures of all interested parties. Moreover, the principal's autograph is mandatory. Without it, the document is considered void. As for the attorney, his signature is desirable, but not required. In some cases, such powers of attorney are certified through a notary office. In this case, a notary signature and seal are affixed here.
Key Features
After studying the account data of the insured person, you should proceed to a description of the functionality provided by the FSS personal electronic account. It is advisable to consider the most important of them in detail.
Journal of benefits and payments
The function of viewing this type of journal opens after going to the section of the main menu of the FSS LC “Benefits and Payments”. This will allow you to display a document whose data can be grouped using a special filter according to several criteria:
- ELN number;
- date of issue of the document;
- request status, which must be selected from the drop-down list.
To obtain information about the details of calculating a specific benefit or social payment, you need to activate the context menu by clicking the left mouse button, and then follow the link to the “Benefit Calculation” tab. After this, a detailed calculation certificate is displayed on the screen.
Electronic sick leave
The functionality of the personal account of the Internet service in question allows you to obtain both generalized information about the personal health insurance issued to the user, and data on each of the sick leaves. In the first case, to display information on the computer screen, you should go to the “Certificates of Incapacity for Work” section.
To obtain detailed information on one of them or a group of electronic sick leave, you can use the filter located at the top of the table that opens, or left-click on the number of a specific electronic certificate of incapacity for work.
Rehabilitation programs
Gaining access to rehabilitation programs is carried out by launching the main menu item with the same name. The list displayed on the screen contains all the programs that are suitable for the insured person. They are located in three contributions - individual, programs for victims and conclusions of specialists from the medical commission.
Social PIN
Viewing the data of the so-called PIN or personal information navigator occurs by launching the corresponding context menu item. After this, a graph containing the following information is displayed on the screen:
- status of completed request or undeclared need;
- plans for the next event to replace technical means of rehabilitation (TSR products);
- the current date, displayed in blue;
- the expiration date of the IPRA, highlighted in red.
Spa treatment
Launching the main menu item of the same name provides access to view and study data on sanitary resort treatment. They represent a list of user requests for CCL services with a display of their status. To make it easier to search for an application of interest to the insured person, a filter is placed on the page, which includes several criteria, including: the number or status of the application, the nature of the treatment, the name of the sanatorium and the date of filing the application or treatment.
Compensation for accidents and occupational diseases
A special section of the menu is provided to provide the user with information about compensation received or available for receipt for accidents and occupational diseases. To make working in your personal account more comfortable, a filter has been developed that allows you to find the compensation you are interested in based on one or more criteria, for example, the type and category of the insured event, the type of injury or disease, the date of the incident and its status.
Birth certificates
A separate section of the FSS personal account is allocated to generic certificates registered in the system and issued to the user. After going to the corresponding menu item, a table opens with a list of all similar documents issued for the recipient of insurance services. They are sorted by any column name.
Requests to the Social Security Fund
The procedure for submitting an official request to the FSS is launched in two ways. The first involves activating the “+Create” menu section and going to the “Submit a request to the Fund” subsection, and the second opens the necessary form by selecting the “Requests to the Fund” item from the username context menu, which is located in the upper right corner of the main page of the Personal Account.
In the latter case, a table opens with already created and sent requests, also containing their status. To submit a new request, the corresponding service “+ New request” located at the top left is activated.
Preparing for work
Instructions for setting up an electronic signature of the FSS (Social Insurance Fund) include several points:
- registration in the system;
- redistribution of responsibilities;
- notification of changes in the system.
Work in the system includes both processing benefits, reporting, and other operations. And the advantage of registering in the FSS information system is saving physical and financial resources, as well as simplifying the work process while simultaneously increasing its reliability.
Registration in the system
To work with electronic sick leave certificates, a medical institution must register a personal account in the Unified Information Integrated System of the Social Insurance Fund (UIIS “Sotsstrakh”) on the website cabinets.fss.ru. Entrance to the account is possible through the personal account of a legal entity on public services. If there is no personal account on the government services portal, then it can be created through the Unified Identification and Authentication System (USIA). To do this you need:
- Go to the “Organizations” tab on the website esia.gosuslugi.ru.
- Create an account (confirmed) using the FSS digital signature issued in the name of the head of the medical institution or his authorized person (a notarized power of attorney is required).
- Fill out the form indicating the details.
After this, you can go through a simple registration procedure in the Social Insurance Unified Insurance System and read the instructions for using the system. Each IP participant has his own functions in his personal account:
- for hospitals, it is possible to download electronic sick leave certificates signed by the CEP;
- the accounting department has the ability to check employee sick leave and receive the latest information for calculating benefits;
- clients have the opportunity to check the accrual of benefits and the correctness of filling out sick leave;
- Doctors can issue electronic sick leave for all categories subject to the conditions prescribed in Federal Law-63.
The conditions necessary for issuing sick leave in electronic form include:
- availability of registration in the automated electronic sick leave system with the medical institution and the insurer’s employer;
- availability of written consent from the patient to issue a sick leave certificate in electronic form.
The list of data required for conducting a medical and social examination and calculating benefits is approved in a separate Decree of the Government of the Russian Federation under number 1567 dated December 16, 2017.
Redistribution of responsibilities
To distribute responsibilities, it is necessary to appoint an accountant responsible for working with EBL, and also obtain an electronic signature from the Social Insurance Fund for him. To work with electronic sick leave, the FSS has developed a free and simple program that can be downloaded through the personal account of the head of the organization.
The program allows you to fill out, upload and send sick leave certificates to the FSS, and regions with direct payments additionally have the opportunity to create and send a register to the FSS. The Extern program features a clear and user-friendly interface, as well as built-in operating instructions, round-the-clock technical support and compatibility with all operating systems.
Notice of Changes
After the organization has connected to the information system, it is necessary to notify employees that they have the right to issue sick leaves in electronic form. This is usually done using an order or sending a notification via corporate email.
For employees, the advantage of EBL is:
- simple and quick registration;
- no risk of loss or damage;
- ease of transfer to the accounting department;
- speed of payment.
In regions with direct payments, the Social Insurance Fund pays for sick leave provided in electronic form within 3 working days.
Other possibilities of the FSS LC for the insured
The functionality of the personal account of the recipient of insurance services is not limited to the possibilities described above. In addition to these, the user can:
- print or save information from electronic information in electronic format;
- receive information about the accrual and subsequent payment of regular benefits for persons caring for children or incapacitated adults;
- receive information about the insured person's applications and their current status;
- view notifications regarding FSS responses to submitted applications and requests.
The list of opportunities provided to insured persons is constantly increasing. This is due to active testing of the system and constant changes to the FSS personal account service.
FSS certificates for 1C
Medical institutions use not only paper sick leave, but also electronic certificates of incapacity for work (ELN). This simplifies the interaction between hospitals, Social Insurance Fund and employers.
Exchange with the FSS is implemented in 1C. If the 1C-Reporting service is connected, the settings are performed automatically. If the service is not used, the process will take a little longer.
In the instructions, we will look at how to independently download and install FSS certificates for 1C, as well as setting up exchange with the FSS using the example of the 1C 8.3 ZUP program.
Where to download certificates for working with 1C FSS ELN
To work you will need several FSS certificates:
- FSS certificate for ELN - to download, go to the FSS website and click on the link FSS authorized person certificate 2020 :
- FSS certificate for receipt - follow the link and download the certificate from GOST R 34.10-2012:
- Root certificates of the FSS CA - go to the Portal of the authorized federal body in the field of using electronic signatures using the link: Download all certificates on this page - they are available in the Imprint .
- Certificates of the head certification authority - go to the Portal specified in paragraph 3 in the Head CA section and download all the certificates:
As a result, there will be many certificates on the computer. For convenience, place them in one place:
How to install FSS certificates on a computer
All certificates are installed in the same way, the only differences are in the place where they will be stored.
Let's look at the installation using the example of the FSS certificate for ELN.
Open the certificate by double clicking the mouse and click Install certificate :
In the Installation Wizard, select the storage location Current User and click Next :
Select the radio button Place all certificates in the following store and click the Browse Other users folder :
Click OK and Next .
Click Finish to complete:
A message will appear:
Do the same steps for other certificates:
- FSS certificate for the receipt - place it in the Other users .
- Root certificates of the FSS CA - in the Intermediate Certification Authorities .
- Certificates of the main certification authority - in the Trusted Root Certification Authorities .
How to install a certificate of the insured organization
Contact an accredited certification center to obtain an organization certificate. If you plan, in addition to downloading the electronic tax record and sending the electronic tax registration registers , to also send 4-FSS and the Register of information necessary for the assignment and payment of benefits , then the certification center must be in the list of trusted centers of the 1C company.
Then install the cryptoprovider CryptoPro CSP or VipNet CSP. Let's look at installing an electronic signature using CryptoPro as an example.
Run the program and on the Tools click View certificates in container :
Select the container using the Browse or By certificate , set the Entered name specifies the key container radio button to User and click Next :
Click Install :
The certificate will be installed in the Personal :
Account settings
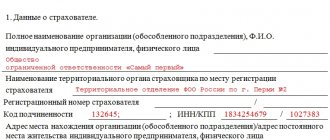
Work in the system, as a rule, begins with studying personal data about the user. It requires activating additional menu items, which are opened by clicking on the three dots located in the upper right corner. One of the sections is called “Information about the policyholder.”
It contains the following information about the insurer:
- full and abbreviated name of the legal entity;
- address and contacts of the organization;
- data from the Federal Tax Service and the Federal Tax Service of the Russian Federation on the payer of taxes and mandatory social contributions.
Installation and configuration of exchange certificates with the FSS
- FSS Certificates
- Policyholder Certificate
- Setting up certificates in 1C
When using the 1C-Reporting service with the FSS direction connected, the settings and certificates required for the exchange are installed automatically.
Otherwise, and also if you need to use an electronic signature certificate (hereinafter referred to as ES) issued by a third-party certification center (other than Kaluga Astral CJSC), exchange with the FSS is also possible, but the settings must be made manually.
Important: in the “cloud” mode of working with the database, provided that the ES of the 1C-Reporting service is stored in the cloud, connecting a third-party ES certificate for exchange with the FSS is impossible.
What settings need to be made in this case?
To set up an exchange with the FSS, you need:
- Install cryptoprovider CryptoPro CSP or ViPNet CSP.
- Install the FSS certificates and the certificate of the responsible person of the organization (the policyholder) on your computer.
- Specify certificates in 1C settings.
Note: with manual settings, FSS certificates must be kept up to date and updated from source sites.
FSS Certificates
FSS certificates should be downloaded from government portals and installed using built-in Windows tools.
Required Certificates
Certificate Name in 1C settings Certificate storage Download link Note
| Certificates of the main certification authority | Not specified in settings | Trusted Root Certification Authorities | https://e-trust.gosuslugi.ru/MainCA | It is recommended to install everything |
| Root certificate of the CA FSS of the Russian Federation | Not specified in settings | Intermediate CAs | https://e—trust.gosuslugi.ru/CA/View?ogrn=1027739443236 | It is recommended to install everything |
| Certificate of public key signature of an authorized person of the FSS of the Russian Federation for encrypting the report and verifying the receipt | FSS Certificate | Other users | https://fss.ru/ru/fund/download/282307/index.shtml (“Qualified public key signature certificate of an authorized person for signing the receipt of payment acceptance GOST R 34.10-2001”, for all policyholder certificates issued after 12/31/2018 g. – “Qualified public key signature certificate of an authorized person for signing a receipt for payment acceptance GOST R 34.10-2012”) | News about the certificate renewal is published on https://f4.fss.ru/ |
| Public key signature certificate of an authorized person of the FSS of the Russian Federation for ELN | FSS ELN Certificate | Other users | https://lk.fss.ru/eln.html (“Certificate of an authorized person 2019 (algorithm GOST R 34.11-2001/34.10-2001)”, for all policyholder certificates issued after 31.12.2018 - “Certificate of an authorized person 2021 (algorithm GOST R 34.11—2012/34.10—2012)") | Manually installed certificates must be renewed periodically |
Certificate installation procedure
- Download the certificate using the link with the “fingerprint” number (unique code).
- In the certificate window, on the General
click
Install certificate
. - In the “wizard” that opens, specify the storage location – Current user
. - Specify the certificate store as recommended in the table.
- Finish settings ( Finish
).
Policyholder Certificate
To download electronic certificates of incapacity for work (ELN) and send ELN Registers for sending to the FSS
(for more details see https://its.1c.
ru/db/staff1c#content:34781:1) you can use a certificate of the responsible person of the organization (policyholder), issued by any certification center, but to send reports to the FSS ( 4-FSS
and
Register of information required for the assignment and payment of benefits
provided for by the pilot project, https://fss.ru/ru/consultation/255319/index.shtml) - only to trusted certifiers, see https://v8.1c.ru/ buhv8/18/187.htm.
Certificate installation procedure:
- Launch a crypto provider (VipNet CSP or CryptoPro CSP).
Access to the program on the user’s computer depends on the operating system: in the Windows family it is carried out through the menu Startor start screen().
- Install a certificate (VipNet CSP or CryptoPro CSP) in the current user’s personal certificate store.
In VipNet CSP the installation process is started with the command Install certificate.
The certificate selection dialog box opens. The installation wizard helps you install the certificate into the current user's certificate store.
In CryptoPro CSP
you need to go to the
Service
, select
the View certificates in container
.In the window that opens, specify the private key container; the Entered name radio button specifies the key container
set to
User
and click
Next
.A certificate viewing window will open. There you should click Install
. The certificate will be installed in the current user's Personal storage.
Setting up certificates in 1C
Installed certificates should be specified in the settings for exchange with the FSS (workplace “1C-Reporting” - Settings
—
Reporting in electronic form
—
Settings for exchange with regulatory authorities
—
Advanced settings
—
Settings for exchange with the Social Insurance Fund
).
Note:
in programs of the “1C: Accounting 8, edition 2.0” family, the settings are located in the
Organization
on the
Document Flow
, button
Configure parameters for sending reports to the Social Insurance Fund
.
Source: https://its.1c.ru/db/content/elreps/src/3_3%ED%E0%F1%F2%F0%EE%E9%EA%E0%F1%E5%F0%F2%E8% F4%E8%EA%E0%F2%E0.htm