Home / Labor Law / Labor book
Back
Published: 06/18/2018
Reading time: 4 min
0
278
The insert is a supplement to the work book. The need for an insert arises when there are a large number of entries in the employee’s book. There are certain rules for filling out the document.
- Why do you need an insert?
- Decor
- Who's buying
- How it is sewn in
- What to do if the liner is damaged?
Common Mistakes
Of course, the labor legislation of the Russian Federation obliges every HR department employee to study special rules and instructions that provide an exhaustive list of norms and recommendations for filling out and storing work record forms at the enterprise. These rules also did not bypass a special procedure - registration and certification of inserts in work books. Unfortunately, some personnel officers neglect these rules, thereby causing significant harm to employees’ employment documents. Let us list the main “errors” of personnel employees associated with inserts in the work books of enterprise employees:
- Instead of legally registering inserts in work books, HR department employees continue to enter basic information about work in the “Information about awards” section}
- paste blank white sheets of paper at the end of the work book, imitating the continuation of the work book}
- blank sheets from old forms of work books are prepared as inserts.
All of the above actions are illegal. Information that is entered into such pseudo-inserts loses its legal significance. It is important that personnel employees must know not only how to draw up, but also how to attach the insert to the work book.
Results
The labor legislation of the Russian Federation requires the personnel services of Russian employer companies to use inserts in work books in certain cases. In this case, the inserts and the main document must be combined physically - by stitching, and also legally - by putting the necessary details on the book and registering information about the insert in a special accounting book.
You can familiarize yourself with other nuances of personnel document flow in the articles:
- “We are drawing up a fixed-term employment contract - sample for 2016”;
- “How to write a notice of termination of a contract - sample.”
You can find more complete information on the topic in ConsultantPlus. Free trial access to the system for 2 days.
Registration and certification
The law clearly establishes the procedure for preparing inserts in work books. These inserts are subject to absolutely all the requirements applicable to the work book. The main stages of the formation of an additional labor document - an insert in the labor book form:
- If there are no more empty lines in the “Information about work” section or in the “Information about awards” section, the personnel employee is obliged to continue filling out the work book. This is done by sewing in liners.
- On the title page of the work book, a mark and stamp are placed in the upper right corner indicating that the insert was issued.
- Also, the work book must contain the number and series of the issued insert.
- The manager is obliged to provide each of his employees with work books and inserts, and each personnel officer must know how to sew the insert into the work book so that in the future there will be no problems regarding the calculation of the insurance and work experience of the owner of the work form.
- The insert is not an independent document, therefore, according to the law, it is considered that the insert without a labor document is invalid.
- If there is no stamp, you can handwrite the phrase “insert issued.” Such actions are not considered illegal, but the employer will eventually have to purchase the necessary stamp.
- The rules for filling out the title page of the insert are the same as when filling out the title page of a work book.
How to attach an insert to a work book
After proper execution and certification, the inserts must be recorded in the work book. If you neglect this rule, then there is a potential threat of losing the liner.
The legislator does not give clear instructions on where exactly the inserts should be secured: at the end of the work book, at the beginning or in the middle. The solution to this issue depends entirely on the preferences of the employer. However, for convenience, it is customary to secure the liner at the end of the work. This arrangement will not only contribute to the safety of the insert, but will also not disrupt the chronology and order of the entered data.
An important question remains the following: is it necessary to sew an insert into the work book? According to the current acts of labor legislation, all issued inserts must be sewn in. Gluing inserts, attaching with staplers, or gluing with tape is not allowed. Only sewing is considered the most reliable way of attaching the liner to its “relative”. Sewing is used universally when attaching certain critical documents. An example would be document flow in accounting.
How to properly sew an insert into a work book
Sewing prevents not only the loss of the liner, but also its replacement and other illegal actions. Normative acts do not contain separate provisions on what kind of thread to sew the liner in and how many punctures to make. These issues are not so important, so the choice remains with the immediate supervisor.
In practice, it is customary to sew the insert into the work book with a strong thread, usually with 4 or 5 punctures. Please note that this requirement is not mandatory. No one will punish the “offender” for the wrong thread color or for an extra puncture in the work form or in its insert.
Please note that the numbering in the insert does not start from the beginning, but continues further. Payment for the insert form can be paid by the employee in several ways:
- deposit money into the company's cash register}
- transfer money to the current account}
- funds may be withheld from wages (the written consent of the employee is required).
There are also local acts of enterprises that already stipulate methods for issuing inserts in work books, as well as methods for paying for them. For example, provisions on internal labor regulations at an enterprise may contain clauses related to free or preferential registration of inserts in the work book.
Sometimes there are cases when an employee does not pay the cost of the labor insert at all. This situation may arise if the work insert is re-issued after the previous version was damaged not through the fault of the owner, but through the fault of the responsible employee of the HR department who filled out the original version.
Is it necessary to sew an insert into the work book?
The employer is required to fill out the work book within 5 days from the date of hiring the applicant. The following information is entered into the work book (insert):
- place of work;
- position held;
- information about the transfer (if any);
- changes in the name of the enterprise (if any);
- date of dismissal;
- reason for dismissal.
All records should not be abbreviated, with the exception of information that can be abbreviated according to generally accepted rules. Naturally, over time, the sheets in the work book may run out. And that’s when you need to sew in the liner.
How to do it?
How to sew an insert into a work book? The rules on maintaining work books (Resolution No. 225) do not provide clear regulations for sewing in inserts. There are no requirements for where exactly the liner should be sewn or what color the threads should be. There is only one requirement - the insert must form a single whole document with the work book, that is, its simple attachment without sewing is not allowed.
If we think logically, then according to the instructions, the numbering in the work book and the insert must be continuous, therefore, the insert must be sewn in after the last sheet, before the cover.
First step
How to sew an insert into a work book? You will need thread, a needle and an awl. It is imperative to make sure that there are indeed no blank sheets in the work book for recording information about admission or dismissal.
The insert should be sewn to the back page of the cover, preferably even to the spread itself. It is necessary to make several stitches so that the liner does not fall out in the future. It is recommended to use threads in muted tones.
After sewing in, the booklet and insert should form a single document. Gluing the insert or fixing it with a stapler is not allowed. This prohibition is enshrined in paragraph 38 of the Instructions for maintaining work books.
Second step
How to sew an insert into a work book step by step? Now you can make an entry directly into the insert. By the way, the first and second steps can be swapped.
Information about the individual to whom the work book belongs is entered on the first sheet of the insert.
A note must be made on the title page of the book indicating that an insert has been issued.
Third step
How to sew an insert into a work book? Now that the information about the employee is filled out, you can proceed to making a record of admission, dismissal, or transfer.
In the work book movement book, a note is also made that the procedure for issuing the insert has been completed.
This completes the sewing procedure.
What if you don't sew in the liner?
It seems clear how to properly sew an insert into a work book, but what if this is not done? First of all, the owner of such a book may have problems in the future when applying for a job in another organization or when applying for a pension.
The insert itself without a work book is not valid, even if there are stamps and notes on it.
Regulatory documents and acts
Despite the fact that we said earlier that not a single regulatory legal act provides an explanation of exactly how to carry out the procedure for sewing in a form, some of the acts in the field of labor legislation still talk about how to act in a situation where if the sheets in the labor report simply simply ran out.
A good example is Article 38 in Government Decree No. 225 , dated April 16, 2003, dedicated to work books.
This article establishes the fact that it is possible to sew a form into a work book, but only if the remaining pages have run out. Unauthorized entry of a form into a work record, in which there is still free space left, is considered damage to the work record and the document will be subject to restoration in the form of issuing a duplicate
Step-by-step instruction
Despite the fact that sewing in one sheet takes approximately ten to fifteen minutes, this procedure has a number of nuances.
Unfortunately, HR officers and employers are not familiar with them, and, to tell the truth, it is very problematic to get acquainted with them, because they are not provided for by law, however, there are clear regulations that must be observed and ignorance of its steps does not relieve one from responsibility. Therefore, let's take a closer look at these stages.
In order to correctly insert the form into the work document, you will need to perform the following steps:
- a HR specialist should inspect your work report to see if there are any blank pages;
- then he must obtain a new blank form from the human resources department or from the employer;
- registers it in the specialized book of the organization;
- puts a corresponding stamp on the form;
- fills it out;
- fills out the title page of the insert;
- puts the required entry under the required numbering.
At this point, the stages of sewing in the form are completed; now it’s worth understanding the nuances.
Where should I sew it?
Inexperienced personnel department employees have no idea where to sew the form. Many tried to stick it to the title page, to the back of the book, in the center, or simply insert it without using threads or needles.
In fact, holes are made in the form in the same place as in the book forms. The form is sewn to the spread where there is the last page of the work report. It is stitched with neat stitches, preferably with black, blue or gray threads. This completes the sewing process.
What exactly should I hem with?
Many people use various tools, including a hole punch, but in fact, the only correct tool for sewing is a regular needle and thread.
Also, an ordinary, not thin awl will help you in your business. Using an awl, you must carefully make holes in the right places on the forms, and then using a needle and thread in neutral colors, simply secure the form.
How to properly sew an insert into a work book using threads: sample work on video:
What to do if there is no stamp?
The organization must have a stamp. But it often happens that a legal entity has just begun to function, and the stamp simply has not been made yet. In this case, you can use two options for the development of events.
The first is to urgently order a stamp and receive it within a day or the next day.
You can also put information that the form is sewn in with a simple pen in the place where the stamp should be.
Using a blue or black pen, in legible handwriting, you write the phrase “insert issued” and also put a date and signature.
How to sew in a liner correctly: step-by-step instructions
The legislator has not established clear requirements for the process of sewing in the liner. Let's look at the step-by-step instructions for document preparation used in practice.
Filling out the form (step 1)
The work book is stamped “Insert issued” . Usually the mark is made on the inside of the title page.
Sample entry “Insert issued”
The responsible employee enters the series and document number. Next, fill out the first page.
Recommendation! If the stamp is not made, it is allowed to enter information about the document with a ballpoint pen with blue or black ink. The employee writes “the insert has been issued”, puts the date and signature. Handwriting must be legible.
Preparing tools and documents (step 2)
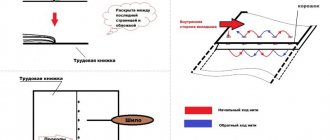
Then the personnel worker prepares an awl, scissors, a needle, and black or white thread. The form is unfolded in the middle, the work book is on the last spread.
The process of preparing for sewing the liner
The HR department employee places one document on top of another and makes punctures with an awl along the folds.
Punctures in the work book and insert
Usually 4-5 holes are made.
Sewing the liner (step 3)
Finally, you need to carefully sew in the form. The thread is passed through the holes several times.
Sewing an insert into a work book
The threads are brought out in the middle, tied tightly into several knots, and the ends are cut off.
Not all HR employees know how to properly embed a document. Therefore, questions arise: where to sew the document, with what threads, can it be stapled or glued? Watch the video instructions for sewing in the liner.
Need to know! The law does not limit the maximum number of inserts. There may be several forms. They are sewn in one after another after filling the previous one. Each time it is marked with the details.
Making an entry in the accounting journals (step 4)
After completing the work, the HR specialist makes an entry in the receipt and expenditure book and the movement log. Magazines are numbered, stitched, threads glued, wax sealed or sealed. The head of the company certifies the seal with his signature.
Why do you need an insert?
An insert is an addition to the work book, which is inserted into it when all pages of one of the sections of the document are filled out. Typically, an insert is required to continue making entries in the job details section. When you frequently change organizations or when there are numerous transfers within one organization, the pages in this section fill up the fastest.
Without a work book, the insert is invalid, since it is an appendix to it, and not an independent document. The number of inserts is not limited.
Decor
The insert must be prepared as follows:
- Indicate on the title page the date the insert was filled out , and not the date the work book was created.
- Indicate on the title page information about the employee that is current at the time of filling out the document. That is, if the surname, education or other data indicated on the title page of the work book changes, the currently relevant information is taken.
- Place the signature of the employee responsible for filling out work books and the seal of the organization at the bottom of the title page.
When registering an insert, a corresponding note is placed in the work book - “Insert issued”, its series and number are indicated. The marking can be done manually, but it is advisable to use a special stamp. The mark must be placed in such a way that it does not cover other entries, but is readable.
Who's buying
Providing inserts is the responsibility of an employer who, during work, runs out of pages in one of the sections of the work book. Any organization must have concluded agreements for the purchase of forms of these documents. When issuing an insert for an employee, the employer by law has the right to recover the amount of money spent on purchasing the form from the employee. This is done by deducting an amount equal to the cost of the insert from the employee’s salary.
It should be noted that the employer can recover the amount spent on purchasing the form from an employee only on the basis of a corresponding order. Without an order, it is illegal to withhold funds to pay for the cost of the liner.
How it is sewn in
There are no strict requirements regarding sewing the liner into the work book. In practice, the most popular and convenient option is to sew the document into the end of the work book between the last page and the cover. Two small holes are made in the middle with an awl, the same holes are made at the same level in the work book. Using a large needle and strong thread, the documents are sewn together.
An important condition is that the insert is firmly secured, otherwise there is a risk of losing the document.
You can sew the liner not only by hand, but also using a sewing machine. To do this, you need to select the maximum stitch pitch width and stitch the documents. This option is more convenient and reliable, but not all employers have the opportunity to use such equipment.
What to do if the liner is damaged?
The most common reasons for damage to the liner:
- entering false information;
- incorrect seal (or seal placed in the wrong place);
- illegible signature of the personnel officer;
- making corrections without having them certified by a seal;
- Damage to a document as a result of mechanical impact on it (wet, tear, set fire, etc.).
If incorrect information is entered on the title page of the document, the damaged insert is removed and a new one is filled in in its place. In this case, the employer bears the cost of a new form, since the damage was his fault.
If an error is made when a personnel employee of an organization fills out the section with information about work, then replacement of the document is not required. It is enough to invalidate the erroneous entry and then enter the correct information.
In case of mechanical damage to a document, a duplicate is made. All information about the employee’s work experience is transferred from the old insert to the new one. The cost of the document is paid by the employer if the damage was caused by his fault. If the insert was damaged when it was in the citizen’s hands along with the work book, the cost of its duplicate is paid by the citizen himself. In this case, the insert is filled out at the last place of work.
How to fix the error?
If an employee makes a mistake when sewing, you should carefully cut the threads and remove the document. It is considered damaged and is disposed of.
Read more: Schedule of familiarization with the materials of the criminal case
A special commission draws up a write-off act. It indicates the number, series of each document, and the reason for destruction. The series and numbers cut out from the forms are pasted into the act. Damaged documents are shredded with a shredder or burned in a boiler room.
The personnel worker fills out new documents.
What is an insert in a work book?
This is a strict reporting form issued when there are no fields to fill out in the employment document. It has a unified form with several spreads - for making entries regarding work activities and awards.
The main need for these sheets lies in the ability to continue to enter information into the main labor document, since such actions as:
- Pasting clean simple leaves;
- Opening a new book;
- Sewing blank forms from work books;
- Rearranging sections is not allowed.
This document must not be printed, nor can a sample of it be found on the Internet or used.
Important: the form is protected and has a special number, which is registered in the appropriate journal. Here you will find out what a hologram looks like in a work book and where it is attached.
In this case, it is necessary to carry out the entire procedure in such a way that the employee has the opportunity to confirm this fact if necessary.
What it looks like and what it contains
This document is subject to the same rules of formation as the main document; this is a prototype of a work book. Without a labor document, it is not valid, since it is intended to continue it, even the page numbering does not start anew.
- The work book insert has 36 pages and is made in a standard format - 88 by 125 mm.
- Its cover is cardboard.
- The title is identical to the labor title.
- The graphs are an exact continuation of the graphs of the main document.
- In addition, the title page states:
- Document Number;
- It has a name and an indication that without labor it is invalid;
- The document also has a coat of arms;
- Next comes the employee’s full name;
- His date of birth;
- Information about education and profession;
- Date of completion;
- Signature of the employee who filled it out;
- Owner's signature.
Step-by-step filling out the document
Important: the insert is usually created by an employer who has run out of pages to fill out the main document.
The registration procedure is as follows:
- Purchasing a form - the document is purchased from a specialized printing house with which the employer has a contract;
- Registration - after purchase, it is necessary to register the form in the receipt and expenditure book (for example, a work record book>);
A record of the issuance of the work insert.
Important: Employees are not permitted to purchase inserts, but reimbursement of purchase costs will be provided.
- Filling out the document - after registration, you must fill out the title page and enter the necessary information in all columns. At the same time, it is not necessary that the information on the title page of the work book and the insert coincide, since during the period of working activity the employee could change his last name, receive several more educations, and master an additional profession within the walls of the enterprise;
- Making records of activities - here everything should be done identically to labor;
- Continuous numbering – continuation of the main document;
- Next is the number of the entry;
- In the 3rd column you should indicate information about dismissal/hiring, without any reductions. How to fill out a work book upon dismissal - read the publication at the link;
- At the end, a reference is made to the basis for action - its number and date of publication.
Information that the insert has been issued is indicated on the title page of the work “Insert Issued.” Such a stamp must have a clear font that can be read, and it must not overlap with other inscriptions.
Important: the series and number of the insert are entered in the stamp. Usually such a stamp is formed as a header in the upper right corner, but this is not necessary.
If a mistake is made in the process of filling out the insert, it is necessary to remove it and burn it, which is why the work stamp should be placed last, since there is not much space for new stamps, and there may be several of them during the owner’s work life.
Sewing the liner
After completing all the previous steps - registering the document, filling out the title page and affixing a stamp, it is necessary to sew the insert into the work book in the correct way.
Important: it is better to perform this procedure after the insert is completely filled, in order to be sure that the actions are correct, otherwise you will have to draw up a damage report.
The legislator did not provide for the place for sewing in the insert; the optimal way for this is in the middle of the book, since there is no need to comply with the protocols and make holes, but usually this is done at the end, so that the sewn document does not interrupt the old entries, but logically continues the last ones.
Important: to ensure safety, the insert must be sewn in - staples, gluing, or simply nesting is unacceptable.
In this case, the sewing procedure itself consists of several stages:
- Using a sharp awl, make several holes along the fold line of the liner at the same distance;
- The cover of the work paper is pierced in the same way so that the holes coincide;
- Next, all the holes are fastened in turn with thread No. 10 cotton; it is necessary that its ends come out in one place;
- The ends are tied in a knot to ensure safety.
What mistakes can be made?
Filling out the document is carried out in the same way as a work book and personnel workers know about this, but in reality they often make mistakes:
- During the registration process, this happens due to incorrectly entered personal data of the employee, since the personnel officer writes down everything according to the words of the owner of the document, but it is necessary to have the relevant documentation in front of you and enter data from it.
Important: if the title page of the insert is filled out incorrectly, you must burn it and get a new one.
- During the maintenance process, errors are most often made in the following cases:
- Invalid hire/dismissal date;
- Incorrectly entered information about the organization;
- There is no indication of the employee’s position or the structural unit in which he works;
- Abbreviation of words;
- Certification by signature and stamp of the employee’s translation;
- Information about the work is entered in the awards columns.
These records are allowed to be corrected:
- The organization whose personnel employee made a mistake;
- A new organization when providing correct data from the old place of work.
In this case, you cannot cross out and write the correct information on top; you should indicate the entry that the previous information is incorrect, and then make a new accurate entry.
All this is very important, since incorrect data will lead to:
- To problems with the employment of the document owner;
- With calculation of length of service when applying for a pension.
What does the liner look like?
The form of the document is approved by Decree of the Government of the Russian Federation No. 225.
Liner sample
The document form is printed by Gosznak . It contains the series, number. Security measures allow you to identify paper and detect counterfeits.
Insert in the work book
An insert without a work book is considered invalid.
Important! You cannot download forms from the Internet and print them out. The production of documents is carried out by the GOSZNAK association. The employer purchases forms from the manufacturer or distributor on the basis of an agreement.
Filling rules
Before sewing in the form, it must be filled out.
The first sheet should contain the following information:
- Full name of the citizen;
- Date of Birth;
- information about education;
- profession, specialty;
- start date of record keeping;
- employee signature;
- signature of the personnel employee.
The employer's stamp is placed in the lower left corner. The pages must be numbered, continuing the numbering of the work book. Information about activities is entered in the same way as in the main document.
When is an insert in the work book completed?
The insert is drawn up as part of the work book in the event that one of its sections is completed and there is a need to further enter data into it. A correctly executed insert becomes an integral element of the book and is not valid without it.
The work book has 3 sections to indicate information about:
- employee (also called title page);
- work;
- employee benefits.
Thus, the HR officer may need to prepare an insert if the fields in any of the specified sections run out. At the same time, as soon as the insert is sewn into the book, you cannot continue making entries in the empty fields remaining in it - subsequent data can only be legally entered into the sections of the attached insert.
Most often, a personnel officer has to perform the following operations:
- filling the insert;
- sewing in the liner;
- legal registration of the use of the insert in personnel document flow.
How to fill out an insert in a work book?
Filling out the insert is in many ways similar to the procedure for filling out the work book itself. So, the personnel officer, first of all, will need to indicate the data in the first section of the insert - on the title page. Namely:
- date of completion of the document;
- personal information about the employee.
The information on the title page of the insert is certified by the signature of the employee himself, as well as a specialist from the company’s HR service.
The next stage of filling out the insert is entering information in sections 2 and 3. The structure is the same as in the work book and reflects data on the employee’s work and remuneration. The basic rules for filling them out are identical to those that characterize filling out the book itself:
- data in columns 1, 2 and 4 are indicated in fields located at the same level with each other, as well as opposite the field reflecting the employer’s implementation of a particular legal action (for example, hiring an employee, dismissal, awarding);
- the serial number of the entry recorded in column 1 must be one more than the previous number (even if it was previously indicated directly in the work book);
- Abbreviations are not allowed when entering data into a document.
How to sew an insert into a work book?
It is best to place the sewn-in insert between the last sheet of the work book and the back half of its cover. To sew in the liner you need:
- take a needle and thread;
- attach the insert tightly to the book;
- sew the insert to the book, piercing it in two places and threading a thread through the resulting holes.
The insert, like the work book, has a cover - it should be sewn together with the insert.
Legal registration of the insert: nuances
Legitimization of the use of the insert as an element of the work book is carried out through:
- entering information about him in the book of work records and inserts;
- affixing the stamp “Insert issued” in the book and writing in its fields the series and number of the insert.
The solution to the first problem, as a rule, does not involve significant problems: all the personnel officer needs to do is enter the necessary data into the unified form approved in Appendix No. 3 to the Resolution of the Ministry of Labor dated October 10, 2003 No. 69.
Conditions for issuing the insert
If there is no free space in the work book and it has come to an end, a logical question arises - whether it is necessary to continue recording and how to do it. The answer to this is provided by clause 38 of Government Decree No. 225 of April 16, 2003 “On work books” (hereinafter also referred to as Government Decree).
When all the free space in any section of the employee’s main document is filled, an insert in the work book is issued. It is issued when it is impossible to make a record of the employee’s activities or awards due to lack of free space. It is important to keep in mind that it is only an addition to the book and is not a document in itself.
The registration of inserts in the work book (their issuance) is carried out by the employer due to the obligation to have at his disposal a sufficient number of forms of this document, provided for in paragraph 44 of the Government Decree. About the issue, a corresponding note is made in the receipt and expenditure book and the book recording the movement of books and inserts. The forms were approved by Resolution of the Ministry of Labor dated October 10, 2003 No. 69 “On approval of the Instructions for filling out work books” (Appendix No. 1 and No. 2).
Regulatory regulation
The main defining act is the Decree of the Government of the Russian Federation “On work books” No. 225 of April 16, 2003.
Since only books of the established type can be used on the territory of the Russian Federation, the insert must comply with these requirements. This is recorded in the Letter of the Ministry of Labor of Russia dated June 15, 2006 No. 908-6-1.
Accounting is carried out in accordance with the rules for strict reporting forms. In particular, the fact of attachment to a document must be recorded in a special journal. The rules are in Resolution of the Ministry of Labor No. 69.
Insert design
The design and filling of the insert is carried out according to the general rule established by clause 38 of Government Decree No. 225.
The form of the form in question is established by Order of the Ministry of Finance dated December 22, 2003 No. 117n “On work books” and must strictly comply with it.
The document form is printed at Goznak enterprises and has approved degrees of protection at the time of issue. It contains the series of the document and its number in order to be able to individualize it and identify counterfeits.
The approved sample will also tell you about the necessary entries in the work book insert. It must contain information about the owner:
- Full name (all in separate corresponding columns);
- date, month and year of birth;
- received education and specialty;
- day, month and year of filling;
- signatures of the owner and the responsible official (on behalf of the employer).
The first page provides space for the employer's stamp. However, individual entrepreneurs are not required to have a seal, and for several years business companies have not had such an obligation (unless otherwise expressly provided by law). In this case, as the Ministry of Labor explained in its Order No. 589n dated October 31, 2016, affixing a seal is not necessary.
Further in the document there are two sections, in one of which information about activities is entered, in the other - award information for the employee.
Document maintenance is carried out on the basis of two main documents:
- Rules for maintaining and storing work books, approved by Government Decree No. 225;
- Instructions for filling out work books, approved by Resolution of the Ministry of Labor dated October 10, 2003 No. 69.
Let us dwell on the peculiarities of numbering the pages of the insert and the entries in it, as well as affixing the appropriate stamp on its design.
Numbering
Since the insert is an appendix to the work book and its continuation, the question arises about the numbering of its pages and the corresponding entries in it. The numbering of its pages is carried out at the stage of its release at the Goznak enterprise, and therefore does not pose any difficulty for the employer. The numbering of records must continue, and not start over, which means that the records must have a continuous (continuing) order.
The work record and the insert into it may contain an entry under the same number. This situation can arise only in one case: when the entire recording does not fit and continues in the application. For example, the book may indicate the name of the organization where the employee is being hired, and then (in the insert) the position he occupies.
Placing a stamp
The fact of registration of the insert on the basis of clause 39 of Government Decree No. 225 must be recorded in the work book. The stamp “Insert issued” is affixed and its individual data (number and series) is indicated.
Following the letter of the law, it is necessary to put a stamp on the document, but a manual entry will not invalidate the insert. Its location is determined by the responsible official, based on the availability of free space. Most often, the mark is placed in the upper right corner of the title page (first page) of the book.
It is advisable to completely fill out the insert properly, check it, make sure that it is filled out correctly and the data entered is correct. Only after this should the corresponding stamp be placed on the book.
Sample design of an insert in a work book 2021. Title page
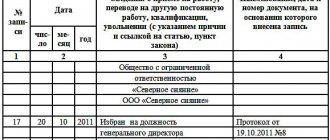
The work record book and the title page of the insert must contain the same relevant information. In this matter, you must follow the official instructions. In the central part of the title there are several columns for recording the name, patronymic, and surname of the employee to whom the work book belongs. Below is the date of birth and specialization of the employee. The work book and, accordingly, the insert must contain information about the employee’s place of study or indicate the education received. Since education is (in some cases) the basis for hiring an employee for the corresponding position. The position fits into the columns of the “job information” sheets. As usual, on these pages of the insert the serial number of the entry is recorded (in the insert the numbering continues and does not start over), the date, as well as the order (with number and date) reflecting the employee’s hiring.
An insert in the work book was issued, a record, a sample, instructions for sewing in
The insert without the main work book is invalid. For high-quality and reliable fastening of forms, the sewing method is used. The insert is inserted unfolded between the last page and the cover of the work book. There are no special regulations for the location of the liner. Using an awl, several through holes are made, through which the insert is attached to the main form with a thick thread. The ends of the thread are secured inside the binding with knots. There is no need to seal this structure with a paper seal, much less sealing wax.
The work book can be supplemented with any number of inserts, as many as needed to enter the necessary up-to-date information. For each title, the title page of the main Labor Code serves as a sample for filling out the insert in the work book for 2021 or any other year. Important note: all inserts are sewn in the same form in which they were released from the printing house. You cannot tear off the paper cover from them.
Entry about the insert in the work book: sample filling
The work book must also have an announcement about the presence of an insert. For convenience, there is and is often used a small rectangular stamp in three lines “Insert issued. Series. Number". If there is no stamp, then it is allowed to write by hand using a ballpoint pen with blue or purple ink. The series and number of the insert must be indicated. The location of the inscription (stamp) is not clearly regulated, the main thing is that nothing should hide this mark, the record should be clear, and the information from the stamp should be readable.
Sources
- https://hr-portal.ru/article/pravilno-prikreplyaem-vkladysh-v-trudovuyu-knizhku
- https://BusinessMan.ru/kak-vshit-vkladyish-v-trudovuyu-knijku—poshagovaya-instruktsiya-trebovaniya-i-obrazets.html
- https://urist.club/administrative/oformlenie-dokumentov/trudovaya-knizhka/vshivaem-vkladysh.html
- https://zakonguru.com/trudovoe/trudovaya/oformlenie-vkladysha.html
- https://FBM.ru/bukhgalteriya/dokumenty/vkladysh-v-trudovuyu.html
- https://nalog-nalog.ru/trudovye_knizhki/kak_oformit_vkladysh_v_trudovuyu_knizhku_obrazec/
- https://trud.guru/dokumenty/vkladysh-v-trudovuyu-knizhku.html
- https://clubtk.ru/kak-zapolnit-vkladysh-v-trudovuyu-knizhku