Good afternoon, dear reader.
This article will discuss how to file your taxes online.
The need to file a declaration may arise in different situations: when receiving income (for example, when selling a car) or to receive a tax deduction (for example, for training in a driving school).
The traditional method of filing a return on paper requires time (travel to the tax office and waiting in line) and money (to pay for travel). You can send your tax return online for free and quickly. This article will cover:
- Preparation of documents for filing a declaration. Declaration file in xml format.
- Preparation of copies of additional documents.
Let's get started.
Preparation of documents for filing a declaration via the Internet
To submit the 3rd personal income tax declaration online you need to prepare:
- Declaration file in xml format.
- Scanned copies of additional documents.
Declaration file in xml format
First of all, you need to fill out a declaration using the “Declaration” program. If you have not done this yet, I recommend studying the following instructions:
Instructions for filling out a tax return
After you have completed filling out the declaration, you need to save it in xml format. It's quite easy to do this:
Click on the "xml file" button at the top of the program window. After that, select the folder where the file will be saved and click the “OK” button.
Preparation of copies of additional documents
All documents that need to be attached to the declaration are additional.
For example, when selling a car, you need to attach 2 sales agreements to the declaration (one for the purchase of the car, and the second for the sale).
When receiving a deduction for training in a driving school, additional documents may include a training agreement with a driving school, cash receipts, a driving school license, a 2-NDFL certificate, and an application for a personal income tax refund.
All necessary documents should be scanned and placed in a separate folder.
Please note that the tax office imposes a 20 MB on the total size of uploaded files, so I recommend scanning documents with a resolution of 150 dpi and saving them in jpg format.
How to send a 3-NDFL declaration for tax deduction in your personal account
The interface of the new account has been transformed and has become intuitive: filing a declaration is elementary. For greater understanding, it makes sense to break the entire algorithm into blocks, acting sequentially.
First, we create an electronic signature (read about how to do this here). In short, click on your full name in your personal account and get to the section with information about yourself. Scroll through the tabs to the “receive electronic signature” sub-item. The most rational and least labor-intensive option would be to choose “store the digital signature in the Federal Tax Service database.” Then we come up with a password and wait for the generation to complete. After this, we will begin sending the declaration.
We select life situations in the top line. We are interested in filing 3-NDFL, so we go to the point of the same name and move on.
At the next step, the taxpayer has a choice - fill it out online or send a ready-made declaration. Deklaracia3ndfl.ru is dedicated to the preparation of 3-NDFL in the program, that’s why our “download” button, but in the future we will also consider filling it out online.
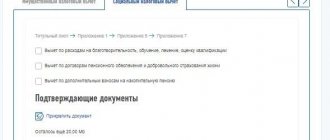
Here we indicate the year for which 3-NDFL is sent. Please note that if you are applying for a tax deduction for several years at once, you need to create a new application each time. You need to send a file in xml format, which is made in the program (To save it from the software, after filling it out, click “XML file” and place it in a convenient place. It is from there that you will need to upload it to the taxpayer’s personal account).
Now you need to attach documents to the 3-NDFL declaration to receive a deduction (look for the list on the website). To do this, press the “attach” button. Papers, contracts and checks need to be scanned, but not everyone has a scanner at home, but a mobile phone with a good camera is more common. Therefore, you can send high-quality photographs with a total volume of no more than 20 MB.
The last step is to enter your email password and click confirm and send.
Deadlines for consideration and status of declaration verification
The verification process can be viewed in the messages section. After filing 3-NDFL through the taxpayer’s personal account, you will receive a notification that the application has been registered. You will then receive a letter in which you can track the status.
I would like to immediately note that in each specific case the time after sending may vary. However, there is a certain limit beyond which the tax office cannot consider the declaration.
According to the NKRF, namely Article 88, the maximum inspection period is 3 months. It doesn’t matter if it was submitted through a personal account, or if it was handed over to an inspector.
When a message is received about the successful result of the desk audit, the amount of overpayment to the budget will appear. The only thing left to do is submit an application for a deduction. To do this, from the main page, go to “life situations” and select the “dispose of overpayment” item. Next, fill in the bank details for a tax refund and submit the application. The period during which the money will arrive is 1 month.
I hope this instruction helped you send the completed 3-NDFL declaration through your personal account and you will receive the 13% due to you from the state without wasting effort, precious time and queuing.
Obtaining an electronic signature verification key certificate
To obtain a certificate for an electronic signature verification key, as well as to submit a tax return, we will use the “Taxpayer Personal Account” service. If you are not yet registered in this service, I recommend that you study the detailed instructions for creating an account:
Instructions for registering in a taxpayer’s personal account
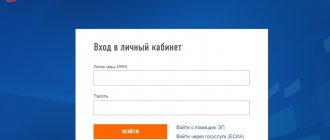
The “Taxpayer Personal Account” service is located on the page: https://lkfl2.nalog.ru/lkfl/
1. Enter your INN and password and log into your personal account.
2. At the top of the screen, click on the button with your full name. In the “Profile” window that opens, click on the “Get electronic signature” link.
3. On the next page you need to select where the electronic signature key will be stored. Possible options:
- On the tax website.
- On your computer.
Storing the key on your computer requires the installation of additional software.
You can choose any of the above methods. However, within the framework of this article, we will consider storing the key in the protected system of the Federal Tax Service of Russia, since this method is faster and simpler.
4. Scroll the window below and check your data (SNILS, INN, full name and address):
After this, you need to enter the password twice. This password will be used exclusively to access the certificate.
Click on the "Send request" button.
5. Wait for the certificate to arrive:
The message states that the certificate can take several hours to be generated, but in practice everything happens much faster. After 5-10 minutes you will receive this message:
The certificate has been received and, if desired, you can view information about it. To do this, click on the “View certificate” link and enter the password.
Information about the certificate will appear on the screen:
Video on the topic: How to open an XML file with a 3-NDFL declaration
As we understand, a certain number of programs are installed on the PC that can open this file. Typically, in such cases, Windows offers a choice of special programs that can open this file. On the Internet, these files are usually opened by search engine robots automatically, and the average website reader does not notice this. But how can it be revealed to the common man?
Let's click on this file with the mouse and try to open it.
Step-by-step instructions on how to submit 3 personal income taxes through the State Services website
If you have the entire package of documents at hand, it will take a little time to submit a declaration online.
To submit a declaration online through State Services, you need to collect the same list of documents as when visiting the department in person. The collected package of documents is scanned. The list of documents will depend on the purpose of submitting the declaration. For example, if a user wants to receive a deduction for a child, he needs to scan the birth certificate of the child(ren). If the child has a disability, provide an appropriate certificate.
To submit a declaration through the State Services portal, you must follow the following instructions.
Step 1. Go to the official website of the State Services portal https://www.gosuslugi.ru/ and enter your personal account.
Login is carried out using a login (mobile number, email, SNILS) and password.
Step 2. Select the “services” section
and the subsection “authorities”.
In this subsection, select the line “Federal Tax Service of Russia”.
Step 3. Select the “acceptance of tax returns (calculations)” section.
In the electronic services column, select “acceptance of tax returns of individuals (3-NDFL).
Select receipt type.
Click on the “get service” button on the right side of the web page.
Step 4. Click on the “fill out a new declaration” button.
Step 5. Select the year to fill out the declaration
and click on the “ok” button.
Step 6. Carefully read the provisions for data processing and give your consent by checking the box “I give my consent to data processing.”
Then click on the “continue” button.
Step 7. Proceed to directly filling out the declaration. First, fill in the correction code. If the declaration is primary, then “0”. If the first adjustment is “1”, the second is “2”, etc.
Step 8. Check the correctness of filling in personal data that was transferred automatically from your personal account on the State portal class=”aligncenter” width=”1200″ height=”883″[/img]
Such data includes:
- FULL NAME;
- Date of Birth;
- citizenship;
- passport details, etc.
Step 9. Select the inspectorate and municipality of the taxpayer. To do this, in the line “IFTS code”, click on the down arrow.
Next, select a region and click on the down arrow next to it.
Select the desired inspection department by clicking the checkmark in the appropriate field.
Then click on the “ok” button.
Step 10. Fill in your income information. This can be done manually or transferred automatically. To fill it out automatically, you need to click on the “transfer from 2-NDFL” button.
To fill it out manually, you need to click on the “add payment source” button.
If no income certificates are found, the system will display an error stating that it is impossible to automatically transfer information.
After filling out this section, you must click on the “next” button.
Step 11. Select the type of deduction (if there are grounds for it): standard, social, property or investment. Check the box “provide tax deductions”.
Step 12. Fill in the required data and click on the “next” button.
Step 13. Click on the “Generate file to send” button.
If the user already has a declaration filled out in a special program, then to send it you must select the receipt type.
Click on the “get class=”aligncenter” width=”1200″ height=”917″[/img] In the pop-up window about the need to sign the declaration with a qualified electronic signature, click on the “continue” button.
Upload the declaration, give your consent to the transfer of information in electronic form and click on the “proceed to signing the form” button.