If documents are stitched incorrectly
- Incorrect firmware of documents may be a reason for refusal to accept them. And this is wasted time, effort and money down the drain.
- Incorrect or poor-quality firmware of your organization’s documents may serve as a reason for interested parties to refuse to cooperate.
- If the documents are not carefully stitched, then there is a high probability that they will be disorganized or even replaced, which will be very difficult to prove during future verification.
And these are just some of the problems that can be encountered when documents are inserted incorrectly.
Documents subject to firmware
You have to stitch documents and copies of documents that consist of two or more sheets:
- staffing schedule;
- orders of personal and general personnel;
- invoices;
- invoices;
- acts of completed work;
- cash book;
- expense reports;
- waybills;
- salary statements;
- other documents.
The stapling procedure must be approached responsibly: documents that are not neatly filed may not be accepted upon delivery, and potential partners may refuse to cooperate with you. Poor firmware and storage can even lead to substitution of papers.
What documents need to be stapled and why?
Documents are stapled to ensure they are not lost or replaced.
Also, documents undergo firmware due to the large flow of documentation, so as not to get confused in business papers. Typically, those documents that are submitted to archives, sent for inspection, or have some value for their owner are subject to stitching.
Documents that must be stapled:
- archival;
- accounting;
- personnel;
- For checking.
The exception is documents for the tax service.
There is no need to sew them together, since tax officials repeatedly have to dismantle them for scanning and other manipulations. Important!
The clerk must remember the accuracy and quality of stitching. Otherwise, if the documents are disbanded or if they are lost, all responsibility will fall on his shoulders.
Periods for storing documents in the archive
The storage periods for documentation are regulated by the legislation of the Russian Federation; they depend on the type of documents:
- 75 years - storage period for business books, notarial records, documents related to personnel or privatization;
- 20 years is the shelf life of patent documentation for inventions, documents on capital construction and design activities;
- 15 years - shelf life of scientific works and research;
- 5 years is the storage period for archival documentation of an agricultural organization;
- 5 years - storage period for documents related to film and photography activities;
- 3 years is the period for which photographic and video documents are stored.
At first glance, the procedure for stitching documents looks complicated, but once you study all the rules, the process will no longer seem difficult.
Author of the article: Ekaterina Moguchaya
To reduce the number of paper documents and think less about their firmware and storage, keep records in the web service for small businesses Kontur.Accounting. Here you can work with legally significant electronic documents: take them into account, exchange them with counterparties and send them to regulatory authorities. Our service includes simple accounting, payment of taxes, salaries and contributions, and sending reports via the Internet. The first 14 days of work are free.
Preparing documents for stapling
Before starting the main work, documents must be prepared. The preparation process takes place in several stages:
1. Cover design.
Covers for documentation come in three types:
- Standard – the usual cover that is most often found. Cover size 229x324 mm, accommodates standard sheets (mostly A4).
- Non-standard – used if the document format is of an unusual size.
- For long-term storage - these covers are made of durable cardboard for longer storage. They must be dense and wear-resistant.
2. Equipment.
We are preparing a set of documents. The pack should contain no more than 250 sheets. Its thickness should be no more than 4 cm. A blank sheet must be added to the block. All paper clips and pins must be removed.
3. Numbering.
Page numbering is done only with a simple pencil. The number is placed in the upper right corner. No Roman notation. The inventory is not included in the numbering. Page numbers should not affect the text of the document.
Important!
In the process of numbering with the title page, the number “1” is not placed; we number only from the second sheet with the number “2”. Basic instructions:
- If the documentation contains a large format sheet, it must be unfolded and numbered in the upper right corner, then folded in the same way. It is hemmed neatly, at one edge, so that it can be unfolded several times.
- In documents, letters are stored in envelopes. First, number the envelope, then all the letters enclosed in it.
- If the volume of documentation is too large (more than 250 sheets), then it is divided into volumes that have their own separate numbering.
- Sometimes documents contain separately numbered editions. They are also numbered, despite the existing numbering.
- If the documentation contains glued sheets, then this document must be numbered as one. Next, an inventory of the attached additions is compiled on the reverse side of this sheet.
- When the sheet is completely occupied and there is no room for numbering, they are numbered on the back of the document.
- If the numbering is incorrect, the number is crossed out and the correct one is added, and a certification inscription must be made on the corrected section.
4. Inventory.
Each bound document must have its own inventory, in which you must indicate:
- organization and title of the document;
- date of filing and shelf life;
- detailed annotation (purpose of storage, content, number of pages and other important notes);
- number of documents and signature indicating full name.
Note!
Documents intended for internal use are stapled according to the rules established by your organization.
Where to file employee statements
> > Federal Law of July 27, 2006 No. 152-FZ “On Personal Data”). The composition of personal file documents is currently established only for employees of state bodies and local governments.
Other organizations (their personnel services and office management services) independently develop and approve rules for the formation of personal files (and not only) depending on the categories of employees and job levels of managers. Not only in state bodies and local governments, but also in commercial structures, the rule of “business turnover” has developed, according to which the personal files of the head of the organization, his deputies, the chief accountant and the internal controller / head of the internal control service are mandatory.
The personal files of such employees have a permanent storage period under Art.
It includes six columns where the serial number of the personal file, last name, first name, patronymic of the employee, his personnel number, position and structural unit are recorded. The serial number of the personal file in the accounting journal is indicated on the front side of the cover of the personal file and on the personal card of the T-2 form.
Every year, the HR department checks the availability and condition of personal files. Info The fact of verification is recorded in the addition to the personal personnel record sheet. Props are provided at the bottom of the reverse side of the sheet
“marks on inspections of the availability and condition of personal files”
, where they write “personal file verified”, indicate the date of the check, position and signature of the employee who carried out it.
We recommend reading: I am not going to work under a contract
If deficiencies are identified in the preparation and management of personal files, a report is drawn up. The results of the audit are communicated to the head of the organization. Personal files are stored in safes or special locked cabinets.
Important If there is no archive, the personal files of dismissed employees are drawn up in accordance with established rules and moved to a shelf designated for storing the personal files of dismissed employees.
Possible stitching options
There are many ways to bind documentation. It all depends on the available equipment and management requirements. Here are some options:
- The classic method is using a needle and thread. Usually a small volume of documents is stitched using two, three or five punctures. The threads are fastened together and a certification inscription is glued to them.
- Using a screwdriver and tight rope. Suitable for bulky materials.
- Using a hole punch. Similar to the classic method, only instead of a needle there is a hole punch.
- Using a binding machine. This type of stitching is used only in printing houses.
What rules govern this procedure?
The procedure is regulated by several instructions:
- Firstly, these are Methodological recommendations for office work, approved by order of the Federal Archive of December 23, 2009.
- Secondly, the corresponding GOST R 51141 , called “Office management and archiving. Terms and Definitions".
- Also, there are a number of legal norms governing the binding of documents. These include: order of the Ministry of Culture of the Russian Federation, which approved standard office management instructions;
- instructions of the Central Bank of Russia, which define the basic standards for conducting office work in the Central Bank;
- methodological explanations on the procedure for filling out individual document forms, approved by order of the Ministry of Taxes and Duties.
Document binding process
We remove all brackets, paper clips, number them, put them in an even pile and begin stitching:
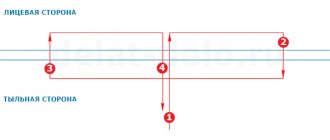
1. Make 3 holes (punctures) in the documents with a needle (if necessary, with an awl). The distance between the holes is about 3 cm. The thread is 80 cm long.
Note!
Regular threads can be fragile, it is better to use thicker and stronger ones. As a last resort, you should fold the thread two or three times. 2. We thread the needle from the wrong side into the middle hole.
3. Then immediately stick the needle into the top hole.
4. After the top puncture, we stick it through the wrong side into the bottom hole.
5. Next, coming out of the lower hole, we pass into the middle one. If you need to stitch a large number of cases, then repeat the stitching process several times to strengthen the folder.
6. Tie a simple knot on the wrong side.
There should be a thread tail of about eight centimeters left. 7. We glue a certification sheet onto the bundle, on which we make the necessary entry. The sticker with the certification inscription usually measures 4x6 cm. The sheet is glued to the knot and part of the threads.
Note!
The documents must be certified by the head of the organization or his authorized representative.
8. We put a stamp and signature.
Important!
When certifying bound documents with a signature and seal, place them so that part is on both the sticker and the document being certified. This will guarantee the safety and integrity of documents.
Important nuances
- It is recommended to certify the bound documentation with the signature of the manager (entrepreneur) and the seal of the organization or enterprise.
- Each of the sheets is numbered manually, and then the number of sheets is entered into the record in numbers and in words. For example: “Eighteen (18) sheets are stitched, numbered and signed.”
- In this case, part of the signature of the authorized person is located on the document, and part of it is on a glued sheet with information on certification. The same rule applies to applying a wet seal to an organization or enterprise.
- For the certification signature, only special tissue paper , which allows you to see the intact attachment point!
- The firmware is entrusted exclusively to persons who have the official authority assigned to them in special instructions.
Fake sick leave - don't even try! Criminal prosecution can end very badly for you. Find out more about the most effective remuneration system in our material. If you are paid a salary “in an envelope,” then our article located here should be very useful to you!
Flashing documentation using a machine (video)
Video instructions on how to use a machine for stitching documents, with which you can complete the job within a few minutes:
In terms of paperwork, office work is a rather complex process. To this day, there is a lot of debate about how to stitch them correctly, but there is no single rule. If you are stitching documents just for storage, it will not require much effort. But if it comes to important papers, then the work should be taken with full responsibility.
What are they stitching with?
You can sew multi-page documentation manually using a thick needle and thread or using a special machine.
To work you will need:
- office glue;
- needle of large diameter and length (for ease of work);
- a sharp awl for making holes (the paper does not crumple when sewing);
- thick threads that easily fit into the eye of a needle (you can use cotton threads to prevent knots from unraveling, but more often nylon or lavsan ribbons are used);
- blank sheet of paper.
Recommendations for choosing threads: stitching LSh-210 (most often used in office work), bank twine, harsh.
Let's return to filing technologies
The stitching methods described above are suitable for both the archive and the tax office. But the filing of accounting documents stored for a long time (more than 10 years) must be especially strong - most often with 5 holes. The certification inscription is made on special tissue paper so that the node located under the sticker is clearly visible and there is no doubt about the integrity of the document.
If in an office setting holes are punched with ordinary stationery hole punches, then if it is necessary to draw up large volumes of paper documentation (for example, in printing houses), professional equipment in the form of paper drilling machines or bookbinding machines is used. Such mechanisms have serious power and can be either manual or equipped with an electric drive.
Let's start with the cover
If theater begins with a hanger, then our procedure is nothing less than with the cover. And the choice of cardboard “crust” is one of the first tasks in the process of “packaging” a document. At first glance, you will not find the difference between the many existing varieties. But, if you take a closer look, you will understand that covers are standard, non-standard, and also used for long-term storage.
Most often you can find a standard cover in the 229x324 mm format. It is used in all cases where sheets of standard size are stitched. If, for certain reasons, the document has a rather specific appearance and parameters, a non-standard type of cover is required. The latter type includes the one in which documents will be stored for 25 years or more.
According to legal regulations, such covers are made only from hard cardboard due to the long working life. It is necessary to take measures to preserve the proper appearance of the document and its suitability for use after a significant period of time. Documents intended for delivery to the state archive are stored in covers made of such material as acid-free cardboard.
