Which legal acts regulate the filling out of the account balance sheet
Historically, the term “ turnover balance sheet ” was not fixed in the regulatory legal acts of the Russian Federation - in fact, it is used unofficially.
However, the corresponding document is widely used in practice. The use of balance sheets is indirectly predetermined by the provisions of Art. 10 of the Law “On Accounting” dated December 6, 2011 No. 402-FZ. This regulation provides that:
- information reflected in primary documents must be registered and accumulated in accounting registers (Clause 1, Article 10 of Law No. 402-FZ);
- the structure of the accounting register must contain a grouping of accounting objects, as well as the monetary value of the corresponding objects;
- the forms of the corresponding registers for private economic entities are approved by management, for state ones - by budgetary legal acts.
The fact that the balance sheet is used as an accounting register can be associated, first of all, with the legal tradition that was formed in the Soviet Union.
Thus, in the letter of the Ministry of Finance of the USSR and the Central Statistical Office of the USSR dated February 20, 1981 No. 35, it is recommended to use just the same turnover statements as accounting registers - for main, synthetic accounts, as well as sub-accounts.
Another significant factor predetermining the use of turnover by modern enterprises is the publication by the Ministry of Finance of Russia of Order No. 119n dated December 28, 2001, by which the department approved methodological guidelines regarding the accounting of inventories of Russian enterprises. The provisions of this legal regulation use 2 concepts:
- turnover sheet - a source that records the amounts of income and expenses that correlate with the movement of goods or materials in the warehouse, balances at the beginning and end of the reporting month, as well as the corresponding amounts in synthetic accounts and sub-accounts;
- balance sheet - a document that generally corresponds to the turnover sheet, but it does not record the receipt and consumption of goods or materials.
Due to the availability of these legal regulations, as well as in the course of document management practices in the business and accounting community of the Russian Federation, more or less generally accepted formats of balance sheets gradually became widespread, the structure of which we will consider further.
There is another significant factor for the compilation of turnover by Russian enterprises. The Federal Tax Service quite often requests them during inspections - both during traditional interaction with taxpayers, and as part of innovative methods of communication with companies, such as tax monitoring.
In particular, clause 8 of the order of the Federal Tax Service of Russia dated 05/07/2015 No. ММВ-7-15/184 states that the regulations for information interaction between the taxpayer and the Federal Tax Service should fix the obligation of the former to submit balance sheets to the Federal Tax Service as part of tax monitoring .
Is the fine for failure to submit SALT to the tax authorities legal? The answer to this question, supported by arguments from law enforcement practice, can be found in ConsultantPlus:
If you do not yet have access to the legal system, a trial of full access to the system is available for free.
How to set up a balance sheet in 1C: Accounting
Published 09.11.2014 11:28 Author: Administrator The most familiar, convenient and necessary report for an accountant is the balance sheet (TCS). It is formed every working day, especially during month-end closing and reporting periods. How can you improve the usability of this tool and customize it to suit your personal needs? Let's look at the basic settings of OSV in the 1C: Enterprise Accounting 8 edition 3.0 program.
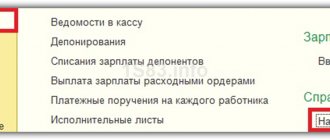
In order to generate SALT, you need to go to the “Reports” tab and select the “Turnover balance sheet” item.
Then click on the “Show settings” button. On the first tab “Grouping” the most important setting is the “By subaccounts” checkbox.
If this box is NOT checked, the SALT is less informative. For example, balances and turnover for account 90 will be shown collectively, without division into accounts 90.01 (revenue), 90.02 (cost) and 90.03 (VAT).
But if the checkbox is checked, OSV looks completely different.
If the SALT, expanded across all subaccounts, seems too voluminous to you, then you can make individual settings for each account by adding to the table on the “Grouping” tab those accounts for which detailed information is needed. The rest will be displayed collectively. You can also indicate in the table whether the selected account needs to be detailed by subaccount (if not, the field just needs to be cleared).
On the next tab “Selection” there is a very necessary setting, which is responsible for displaying off-balance sheet accounts in the report. If you want to see them in the SALT, but you must check the “Display off-balance sheet accounts” checkbox.
After this, balances and turnover on off-balance sheet accounts will appear in the balance sheet.
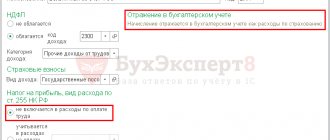
If your organization operates on the OSN and maintains tax records, I strongly recommend checking the “NU” checkbox on the next “Indicators” tab. This is necessary in order to quickly monitor tax accounting in the program and, if necessary, correct errors in a timely manner.
On the “Detailed Balance” tab, you can specify a list of accounts for which you would like to see a detailed balance, and not just a summarized credit or debit balance. This setting may be relevant for settlement accounts with counterparties.
But if it would be convenient for you to see not only account numbers, but also their names in the balance sheet, you need to go to the “Advanced” tab and check the “Display account name” checkbox.
The SALT will look like this:
The last of the tabs, “Design,” will help you add a little variety to your workdays and paint your OSV in colors that suit you. To do this, you need to select a design option.
You can experiment with the settings and choose the one you like best.
If you still have questions about the formation and configuration of OSV, then you can ask them in the comments to the article.
And if you need more information about working in 1C: Enterprise Accounting 8, then you can get our book for free using the link.
Author of the article: Olga Shulova
Let's be friends on Facebook
Did you like the article? Subscribe to the newsletter for new materials
Add a comment
Comments
0 #53 Olga Shulova 02/21/2018 16:52 I quote Barchyn:
Hello, I have 1s 8.2. An error occurred in the database, I wanted to test and correct it, but the testing did not reach the end. The configurator freezes and resets. why could this be please tell me
Good afternoon
Have you tried using the chdbfl.exe utility? Quote 0 #52 Barchyn 02/21/2018 16:11 Hello, I have 1s 8.2. An error occurred in the database, I wanted to test and correct it, but the testing did not reach the end. The configurator freezes and resets. why could this be please tell me
Quote
-1 #51 Ukhova Natalya 01/10/2018 22:57 I quote Taata:
Hello, please tell me, according to my SALT account 73, the amount weighs a certain number, but I can’t find such a document in the program, I’m trying to create a SALT with a different number for this account and of course this amount disappears, I’ve already searched the whole program. Please help me, tell me something my head is already spinning. Thanks in advance
Good afternoon
Try to make an analysis and an account card (reports tab) 73 for a period that is not visible in SALT. Quote 0 #50 Taata 01/07/2018 08:54 Hello, please tell me about the SALT in account 73, the amount weighs a certain number, BUT I can’t find such a document in the program, I’m trying to generate a SALT with a different number for this account and of course this amount disappears, already I've crawled through the entire program Please help me, tell me something, otherwise my head is already spinning Thanks in advance
Quote
0 #49 Ukhova Natalya 12/21/2017 23:30 I quote Aizada:
Good afternoon I am a novice accountant, I recently started working right after university. My question is this: now I wanted to check the income for a certain period on account 6010. But in the turnover, the sales amount shows more than it actually is, and when I open the sales from the turnover, then everything is correct as it should be. Why does the turnover show more?
Hello!
Income from the main type of activity can be viewed on account 90.01.1 (90.01.2 - if UTII), additional income 91.01. Account 60 is settlements with suppliers, 62 is settlements with buyers (your implementation). Do you mean why is the score 62 different from 90.01.1? Quote 0 #48 Aizada 12/21/2017 1:53 pm Good afternoon! I am a novice accountant, I recently started working right after university. My question is this: now I wanted to check the income for a certain period on account 6010. But in the turnover, the sales amount shows more than it actually is, and when I open the sales from the turnover, then everything is correct as it should be. Why does the turnover show more?
Quote
0 #47 Olga Shulova 07/18/2017 11:14 I quote zzCASPERzz:
and how to configure the display of divisions
What accounts should be used to generate SALT by division?
What 1C configuration are you working in (name and version)? Quote 0 #46 zzCASPERzz 07/18/2017 10:13 and how to configure the display of divisions
Quote
0 #45 DragonAgo 05/25/2017 00:56 Good evening, how can I make sure that in the SALT you can see not only the quantity but also the amount?
Quote
0 #44 Olga Shulova 04/18/2017 22:28 I quote Irina Sarycheva:
Hello! Tell me how you can download the balance sheet, which will reflect the numbers and dates of invoices from suppliers from whom materials for construction work were purchased. Version 1C accounting enterprise corp. ed.3.0.
Hello!
You can generate SALT according to account 60.01. If the program settings enable the use of the subconto “Documents of settlements with counterparties” on this account, then in the SALT settings on the grouping tab, you can add a new field, expand the plus sign next to “Documents of settlements with counterparties” and find “In. date”, also add a grouping field “In. number" Quote +1 #43 Irina Sarycheva 04/18/2017 13:28 Hello! Tell me how you can download the balance sheet, which will reflect the numbers and dates of invoices from suppliers from whom materials for construction work were purchased. Version 1C accounting enterprise corp. ed.3.0.
Quote
0 #42 Ukhova Natalya 03.21.2017 18:30 I quote Grumpy:
Hello, tell me what needs to be configured or activated in the program, I have BUKH 3.0 in one database, when forming the OSV, it shows its “relevance”, i.e. by what date the sequence of documents was restored, but in another separate database 1C BUKH 3.0 does not show, I tried to compare the settings, I can’t understand what and where the difference is.
Good afternoon
For organizations and individual entrepreneurs using the simplified tax system, UTII or patent system, when generating reports, the program can automatically check and update accounting data: restore the sequence of documents and close all the necessary months in the background. Perhaps your second base is on OSNO. Quote 0 #41 Grumpy 03/20/2017 23:14 Hello, tell me what needs to be configured or activated in the program, I have BUKH 3.0 in one database when forming the OSV, it shows its “relevance”, i.e. by what date the sequence of documents was restored, but in another separate database 1C BUKH 3.0 does not show, I tried to compare the settings, I can’t understand what and where the difference is.
Quote
0 #40 Alexey 03/03/2017 19:20 In my case, this is not convenient. For example, in SALT for accounts 76-09, 76-06, 76-05, 60, 62, I want that when opening SALT for an account, a report will be generated in the context of counterparties, contracts, and settlement documents. So I save the setting on the account 76-09, and then I need the account 60. And all the settings were lost. They will save it for construction projects for each account... Then it’s better to tick the boxes in each SALT every time
Quote
+1 #39 Ukhova Natalya 03/03/2017 16:03 I quote Alexey:
Good afternoon In 8.3, it is possible that when opening a SALT for any account in the Grouping section, not only the first subaccount, but all of them have a checkmark.
Good afternoon
In 1s Accounting ed. 3.0 it is possible to save any settings. To do this, open the SALT for the account - Show settings - then check the box you need - Save settings. Afterwards, when you log into OSV, the saved settings will automatically appear. Quote 0 #38 Alexey 03/02/2017 17:55 Good afternoon! In 8.3, it is possible that when opening a SALT for any account in the Grouping section, not only the first subaccount, but all of them have a checkmark.
Quote
0 #37 Ukhova Natalya 01/27/2017 09:01 I quote Mark:
Hello, Tell me how to import OSV from 1C for its subsequent sending by e-mail to the addresses of reporting employees who do not have access to the 1C program Thank you
Good afternoon
Any report from 1C, incl. OSV can be saved to your computer in an easy-to-read Excel, PDF, etc. format. To do this, go to the report field, then in the upper left corner there is a round button with a triangle (main menu), then File - Save As and select the desired type file, for example .xls (Excel file). This file can then be sent by email. Quote 0 #36 Mark 01/26/2017 18:24 Hello, Tell me how to import OSV from 1C for its subsequent sending by e-mail to the addresses of reporting employees who do not have access to the 1C program Thank you
Quote
0 #35 Administrator 08/26/2016 14:40 I quote Alina Satorina:
Good afternoon Is it possible in 1c:Accounting Enterprise 8.3 In the report settings selection list, set the default setting, that is, the setting that will be set when opening the report (“Use when opening”). I didn’t find such an opportunity in the list itself, but is it somehow provided for in 1C: Enterprise Accounting 8.3? maybe I'm looking in the wrong place
Hello! I also don’t see such a possibility in SALT. Apparently, it is not provided Quote
0 #34 Alina Satorina 08/25/2016 19:27 Good afternoon! Is it possible in 1c:Accounting Enterprise 8.3 In the report settings selection list, set the default setting, that is, the setting that will be set when opening the report (“Use when opening”). I didn’t find such an opportunity in the list itself, but is it somehow provided for in 1C: Enterprise Accounting 8.3? maybe I'm looking in the wrong place
Quote
0 #33 ElenaT 07.28.2016 21:40 Good afternoon. I work in 1C:Enterprise 8.3 (8.3.8.1784). Previously, when generating SALT with the indicators BU, NU, PR, BP, it “entered” the NU figure and generated SALT for the account only for tax accounting. And now it is being formed again for all: BU, NU, PR, VR. This is not very convenient, is it possible to somehow set up the formation only for accounting or tax or temporary differences?
Quote
0 #32 Olga Shulova 02/17/2016 13:34 I quote Natasha:
Hello. I work in 1C-Enterprise 8.3. For some reason, the debit total in SALT may not be displayed at the beginning of the period (I tried any date), while debit balances in the context of accounts in SALT are present. The balances were entered on December 31, 2014, which is the start date of work in 1C. The total for this date is displayed. Previously, everything seemed to be fine. Thank you.
There's nothing special about the settings, I don't think that's the issue.
I would advise you to make a copy of the database and then test and correct it. Perhaps there was some kind of malfunction in the internal registers of the program, in this case testing will help. To do this, you need to log into 1C in Configurator mode; there should be no working users in the program at this time. Then select Administration - Upload infobase. Then you need to choose where to save the file. There should be some accessible place that you remember, for example, a desktop. The upload will take some time, then a message should appear indicating that the upload is complete. A copy of the database has been uploaded to a file. After that, go back to Administration - Testing and Correction, check all the boxes and run it. It can also take a long time to complete, sometimes more than an hour, depending on the size of the database. Once completed, run the program as usual and try to generate a report. Quote 0 #31 Olga Shulova 02/16/2016 09:36 I quote Natasha:
Hello. I work in 1C-Enterprise 8.3. For some reason, the debit total in SALT may not be displayed at the beginning of the period (I tried any date), while debit balances in the context of accounts in SALT are present. The balances were entered on December 31, 2014, which is the start date of work in 1C. The total for this date is displayed. Previously, everything seemed to be fine. Thank you.
Hello!
Can you take a screenshot of the OSV and send it to shulova_olgamail.ru? Then it will be easier for me to answer you. Quote 0 #30 Natasha 02/12/2016 16:27 Hello. I work in 1C-Enterprise 8.3. For some reason, the debit total in SALT may not be displayed at the beginning of the period (I tried any date), while debit balances in the context of accounts in SALT are present. The balances were entered on December 31, 2014, which is the start date of work in 1C. The total for this date is displayed. Previously, everything seemed to be fine. Thank you.
Quote
0 #29 Olga Shulova 11/12/2015 1:48 pm I quote GalinaV:
Good afternoon When I generate the SALT, the names of the accounts are not displayed, although in the settings in the “additional” tab there is a checkbox “display the name of the accounts”. What's wrong? Moreover, everything was displayed before, but disappeared suddenly. Thank you!
Good afternoon
Surely there has been an update. This is a bug in one of the latest releases. Install release 3.0.42.73, the bug is fixed in it Quote 0 #28 GalinaV 11/11/2015 16:27 Good afternoon! When I generate the SALT, the names of the accounts are not displayed, although in the settings in the “additional” tab there is a checkbox “display the name of the accounts”. What's wrong? Moreover, everything was displayed before, but disappeared suddenly. Thank you!
Quote
0 #27 Olga Shulova 09.11.2015 12:05 Quoting sreda:
Hello! Tell me how to set up the units of measurement in the 1s 8.3 program in the balance sheet in account 10, etc., set it up so that they no longer disappear
Hello!
In the settings, add the required field to the “Grouping” tab and save the setting. Then you can open it at any time. The truth can still disappear, for example, during an update. Quote 0 #26 Wednesday 06.11.2015 13:48 Hello! Tell me how to set up the units of measurement in account 10, etc. in the 1s 8.3 program in the turnover balance sheet, etc., set them up so that they no longer disappear
Quote
0 #25 Olga Shulova 11/04/2015 20:16 I quote Tom:
In 1C 8.3 - SALT for all accounts does not fit on the screen. How to adjust the width of columns in OSV: account, name, turnover, balance.
Hello!
I think only in the configurator. Quote 0 #24 Volumes 02.11.2015 14:59 In 1C 8.3 - SALT by all accounts does not fit on the screen. How to adjust the width of columns in OSV: account, name, turnover, balance.
Quote
0 #23 Olga Shulova 10.29.2015 21:51 I quote Svetlana_C:
Good afternoon. I work in 1C-Enterprise 8.3. At some point, all the numbers in the balance sheet for accounts 99, 90.07 and 90.08 began to double. However, the rest of the accounts are in order. In the cards of the above accounts and in the general SALT, all the numbers are correct. What is the reason?
Hello!
Try testing and correcting the information base. I encountered this error with clients, and they solved it this way. To do this, you need to make a copy of the database (required!), then go to the configurator and select Administration - Testing and Correction, check all the boxes in the top window and start the procedure. It can be executed for a long time; there should be no working users in the database at this moment. Quote 0 #22 Svetlana_C 10.29.2015 20:46 Good afternoon. I work in 1C-Enterprise 8.3. At some point, all the numbers in the balance sheet for accounts 99, 90.07 and 90.08 began to be doubled. However, the rest of the accounts are in order. In the cards of the above accounts and in the general SALT, all the numbers are correct. What is the reason?
Quote
0 #21 Yulenka 09.14.2015 15:39 I quote Sergey_TMSh:
I quote Author: I quote Sergey_TMSh: Hello, 1s accounting 3.0 prof, is it correct that turnover is formed without choosing an organization? and does everything output correctly?
Hello!
In general, everything should be output correctly. Is there one organization in the database? There are many organizations, that’s why I asked about not choosing an organization. Yes, there is only one organization, we have already figured it out, it turns out that those receipts that were posted earlier than the subaccount was registered, the warehouse was missing, all the documents were redone and now everything is fine Thank you very much for your attention Quote 0 #20 Sergey_TMSh 14.09 .2015 14:22 Quote Author:
I quote Sergey_TMSh: Hello, 1s accounting 3.0 prof, is it correct that the turnover is formed without choosing an organization? and does everything output correctly?
Hello!
In general, everything should be output correctly. Is there one organization in the database? There are many organizations, that’s why I asked about not choosing an organization Quote 0 #19 Olga Shulova 09/14/2015 12:47 I quote Yulenka:
Hello! We have such a problem. We installed a new 1C 8.3 database. In the chart of accounts, subconto1 was written - nomenclature; subconto2 - parties; subconto3 - warehouses. We begin to create a balance sheet for account 10, the turnover does not pick up the warehouses. What to do? Help plzzzzz
Hello!
Does the accounting settings in the program indicate that accounting is carried out by warehouse? The second half of this article talks about such a setup (copy the link to the address bar) accountingbezzabot.rf/ …/… And in general, when starting work, a useful article Quote 0 #18 Olga Shulova 09/14/2015 12:44 Quoting Sergey_TMSh:
Hello, 1C Accounting 3.0 Prof, is it correct that the turnover is formed without choosing an organization? and does everything output correctly?
Hello!
In general, everything should be output correctly. Is there one organization in the database? Quote +1 #17 Yulenka 09/11/2015 21:25 Hello! We have such a problem. We installed a new 1C 8.3 database. In the chart of accounts, subconto1 was written - nomenclature; subconto2 - parties; subconto3 - warehouses. We begin to create a balance sheet for account 10; the turnover does not reach the warehouses. What to do? Help plzzzzz
Quote
0 #16 Sergey_TMSh 09.10.2015 13:32 Hello, 1s accounting 3.0 prof, is it correct that turnover is formed without choosing an organization? and does everything output correctly?
Quote
0 #15 Olga Shulova 05.20.2015 22:19 I quote MARI:
Hello, we work in 1s83 Today we encountered the following problem: we need to send our SALT to the counterparty... IN EXCELE! I only got it in PDF... can you tell me if it’s possible (how?) to send turns to EXCEL from 1s8.3. Thank you!
Hello!
Yes, it's very easy to do. Create an OSV, go to the top menu File - Save As (or Save a copy, if there is such an option). In the window that opens below, change the file type from *.mxl to the required one, enter a name and indicate the save location. If you work in 1C: Accounting edition 3.0, then you won’t see the word file right away, there is a small triangle in the upper left corner, click on it, and the desired menu will be displayed. Quote 0 #14 MARIE 05/20/2015 19:57 Hello, we work in 1s83 Today we encountered the following problem: we need to send our SALT to the counterparty... IN EXCELE! I only got it in PDF... can you tell me if it’s possible (how?) to send turns to EXCEL from 1s8.3. Thank you!
Quote
0 #13 Olga Shulova 05.15.2015 16:54 I quote Botagoz:
Good afternoon, please tell me. I'm analyzing the company's report. I look at the SALT for the expense accounts of one company, and there in all SALT the first line is this sign: and on the contrary there is debit turnover (i.e. expense), and on credit the amount of the Total turnover for the period. This sign () is in the first line of all SALT for expense accounts: admin. expenses, sales costs, cost, etc. I just don’t understand, please explain (I really need it for work) what this first line means: ????
Hello!
I don’t quite understand what your OSV looks like. Can you send a picture to shulova_olgauchetbezzabot.ru? Quote 0 #12 Botagoz 05/15/2015 15:50 Good afternoon, please tell me. I'm analyzing the company's report. I look at the SALT for the expense accounts of one company, and there in all SALT the first line is this sign: and on the contrary there is debit turnover (i.e. expense), and on credit the amount of the Total turnover for the period. This sign () is in the first line of all SALT for expense accounts: admin. expenses, sales costs, cost, etc. I just don’t understand, please explain (I really need it for work) what this first line means: ????
Quote
0 #11 Olga Shulova 05/04/2015 22:15 Quoting S AR:
Good afternoon. I'm still learning. I'm trying to figure out 1C 7.7 myself. Please tell me how I can correct the error in the balance sheet. For example, I (as if I paid through the bank for the goods, together with VAT, but I needed to pay the amount of the goods separately, and put the VAT on a deposit of 53 counts. How can this be corrected in the 1c program itself. Thank you in advance
Hello!
Unfortunately, I do not provide advice on working with version 7.7 Quote 0 #10 S AR 05/02/2015 17:05 Good afternoon. I'm still learning. I'm trying to figure it out on my own in 1C 7.7. Please tell me how I can correct the error in the balance sheet. For example, I (as if I paid through the bank for the goods, together with VAT, but I needed to pay the amount of the goods separately, and put the VAT on a deposit of 53 counts. How can this be corrected in the 1c program itself. Thank you in advance
Quote
0 Olga Shulova 04/27/2015 09:11 I quote Sergey:
Hello, I have 3 databases 1c Accounting 2.0 (2.0.64.21) and in one of them, when creating SALT, there is no method of grouping by cash flow items, although in the other two databases this method of grouping is present. The bases are unfinished. Help me figure out the settings
Hello!
Are you forming SALT according to 51 (52) accounts? If so, then the setup is easy: by clicking the button with that name, a panel opens on the right in which you need to add the necessary grouping. Only after completing the settings I recommend saving it. Most likely, this grouping was removed once in this database and this option was saved, so now by default the report opens without grouping. Quote 0 Sergey 04/24/2015 16:43 Hello I have 3 databases 1c Accounting 2.0 (2.0.64.21) and in one of them, when forming SALT, there is no method of grouping by cash flow items, although in the other two databases this method of grouping is present. The bases are unfinished. Help me figure out the settings
Quote
0 Olga Shulova 04/20/2015 09:58 I quote Elena:
Hello. I wonder if these checkmarks at the bottom have always been there or appeared with the last update?) But, in any case, thank you very much!
It seems to me that they have always been Quote
0 Elena 04/16/2015 11:45 Hello. I wonder if these checkmarks at the bottom have always been there or appeared with the last update?) But, in any case, thank you very much!
Quote
0 Olga Shulova 04/15/2015 16:18 I quote Elena:
Good afternoon. We have Enterprise Accounting, edition 3.0 (3.0.39.57). We will be grateful if you help.
The visibility of the header is controlled by a checkmark, which can be found if you click on the “Show settings” button, go to the “Appearance” tab and look at the bottom of the form.
Quote 0 Elena 04/15/2015 13:31 Good afternoon. We have Enterprise Accounting, edition 3.0 (3.0.39.57). We will be grateful if you can help.
Quote
-1 Olga Shulova 04/14/2015 18:11 I quote Elena:
Good afternoon. Please tell me, when creating the SALT, one of the users lost the title (SALT by account "" for the period..). We created a new “user” and it appeared. But later he disappeared again. How to correct this misunderstanding? Thank you.
Hello!
Which 1C program do you work in? In 1C accounting edition 3.0, according to which the article was written, or does your OCB look different? Quote 0 Elena 04/13/2015 14:44 Good afternoon. Please tell me, when creating the SALT, one of the users lost the title (SALT by account "" for the period..). We created a new “user” and it appeared. But later he disappeared again. How to correct this misunderstanding? Thank you.
Quote
0 Igor 01/30/2015 16:06 Thank you, simple and clear.
Quote
Update list of comments
JComments
What does a balance sheet look like (structure example)
The Soviet legacy and modern business practices have led to the emergence of 3 main types of balance sheets:
- compiled from a set of values in synthetic accounts;
- compiled according to analytical accounts;
- combined, combining the previous types of whorls.
Statements on a set of synthetic accounts compiled by different enterprises will generally be very similar to each other, since the list of relevant accounts is approved by law.
In turn, filling out SALT for analytical accounts in each organization may differ in very specific nuances. Let's consider what a typical structure of a balance sheet for analytical accounts might look like.
A typical balance sheet for an active or passive account consists of 7 columns:
- name of a specific account (sub-account);
- debit and credit balance at the beginning of the reporting period;
- turnover within the reporting period by debit and credit;
- debit and credit balance at the end of the reporting period.
Depending on which account the balance sheet reflects - active or passive, an increase in assets is recorded in the “Debit” columns and a decrease in them in the “Credit” columns (for active accounts) or, conversely, a decrease in liabilities in the “Debit” and an increase in those in the “Credit” columns (for passive accounts).
You can check whether you are preparing your accounting registers correctly using the Typical Situation from ConsultantPlus. Study the material by getting trial access to the K+ system for free.
Instructions for the 1C report “Account balance sheet”
Do you have an urgent question about 1C? Or does it need a little modification?
Use our 1C-nick service for an hour. The rate is only 500 rubles per hour!
Often when implementing 1C, a large number of questions arise regarding system reports. After all, when implementing a new system, employees must constantly monitor the data entry process.
Therefore, I decided to write instructions for the most popular report in 1C: Enterprise Accounting “Account balance sheet”.
1. General description The report is designed to view account balances and turnover in the context of various analytics.
It opens through the menu “Reports” - “Turnover balance sheet”.
2. Basic settings
2.1. Setting the period
At the top of the report are the main settings:
The first date field is the period from which the data for the report will begin to be taken, the second field is the period for which the data will be taken. They can be selected or specified manually,
and use the period setting button. After clicking, the “Period Setting” window will appear:
Here you can select ready-made periods for which the report will be generated: year, quarter, month, day, or specify a custom interval. Additional checkboxes “Since the beginning of the year”, “Since the beginning of the quarter” and “Since the beginning of the month” will set the start date from the beginning of the year, quarter or month, respectively. For example, if you select the month “May 2012” and check the box “Since the beginning of the year”, then the period will be from 01/01/2012 to 05/31/2012.
If you switch to the “Interval” tab, you can select the start and end dates relative to the current day.
2.2. Account and organization
Next you need to select an account and organization:
The account is selected from the chart of accounts.
Or it can be driven in by hand. If, when manually filling out an account, it is impossible to unambiguously determine which element of the chart of accounts should be selected, then a list of possible accounts that match the entered value is displayed.
The report is generated for the selected account and all its subaccounts. That is, for example, if you select account 62, then the data for both 62.01 and 62.02 will be taken into account. The organization is selected from the drop-down list.
To generate a report for all organizations, you need to clear the value of this field. But since there is no standard button for clearing the value, you can clear it by right-clicking on the organization and selecting “Clear”
3. Generating, printing and saving a report
Below the main settings there are buttons for generating, printing and saving the report:
In order to generate a report with the current settings, you need to click the “Generate report” button.
To print, click on the “Print...” button. When you click the button, a printer selection window will open
Select the desired printer, set the settings and click the “Print” button. To save the report to an external file, click on the “Save As” button. When you click, a save window will appear where you will need to choose where to save the file and in what format.
To save in Excel format, select “Microsoft Excel Document” in the “File type” field:
After this, you can click the “Save” button. Also, when highlighting amounts or quantities in a report, the system automatically calculates their amount in the field
4. Analytics and indicator settings
4.1. general description
Analytics and indicator settings are located on the right side of the window.
Settings are opened or hidden using the settings button
The settings menu standardly consists of 3 panels: · Indicators · Grouping · Selection But you can add 3 more (Sorting, Design, Additional data), but we will talk about them later.
4.2. Metrics panel
In the “Indicators” menu, select the displayed numerical data: · Accounting amount · NU amount · PR amount · VR amount · Control (BU – (NU + PR + VR)) · Currency amount · Quantity · Expanded balance Depending on the account settings, the accounts will be available to display certain indicators. For example, if account 62 is selected, then the “Quantity” field will not appear in the “Indicators” panel, since quantitative accounting for account 62 is not maintained.
When you select “Expanded balance” for active/passive accounts, the balance is displayed separately for debit and credit.
4.3. Groupings panel
This panel specifies the dimensions and groupings in which the report will be built. In the “Turnover” field, you can select additional detailing of report lines by days, weeks, decades, months, quarters, half-years and years, or refuse additional detailing by selecting “For the reporting period”.
Next, you can check the box “By subaccounts”
When you check the box, the report will be built in the context of subaccounts of the selected account. Next, you set the dimensions in the context of which the report will be built.
If you do not need any measurement in this report, then simply uncheck the box. As a standard, the panel is filled with measurements from the subconto of the account selected in the report. To add additional measurements, click the button. A window for selecting a grouping field will appear.
We find the grouping we need and select it by double-clicking. Also here you can select not only the measurement itself, but also its fields. To do this, click the plus sign next to this measurement and select its field. For example, if you select account 01, the Fixed Asset dimension becomes available and for this dimension you can select Asset Group.
Then the data in the report can be grouped by OS groups.
Here is an example of a report with these settings:
It is also possible to display the dimension in a hierarchical form, that is, each element will be displayed in the same structure in which it is located in the directory. To do this, select the “With groups” type in the “Grouping type” column.
An example of a report with this choice of “Grouping Type”:
In our directory, “Land” is located in the “Land” group. “Mixer” is located in the “Mixers” group, which in turn is in the “Equipment” group. If you select “Groups only” in the “Grouping type” column, then the final elements will not be displayed at all, but only folders will be shown. Example:
You can also change the order in which measurements are displayed. For example, make sure that Warehouses are displayed first, and then detailed by item. Or if, for example, we are looking at data only for several items, it may be more convenient to display the item first, and then the warehouses that contain it. The grouping order is changed using arrows:
4.4. Selection panel
This panel specifies the selections by which you want to select data for the report. As a standard, you can select by subaccount of the account selected in the report. You can select either by directly indicating the element of interest, for example, displaying all balances according to the “Granulated Sugar” nomenclature. Then we simply fill the “Value” column of the desired row with the directory element of interest to us, leaving the “Comparison Type” filled by default with the value “Equal”.
Or you can select with a special type of comparison by selecting it from the drop-down list in the “Type of comparison” column.
There are types of comparisons: · “Equal” – used if you need to display data only for the selected element · “Not equal” – if you need to display everything except the selected element · “In the list” – in this option you can specify a list of elements that should be included in the report. · “In group”—if you select a directory group with this option, the report will include data on all elements of the selected group. · “In a group from the list”—here you can specify a list of groups whose elements will participate in generating the report. · “Not in the list”—items listed in the list will not be included in the report. · “Not in a group from the list”—elements of groups specified in the list will not be included in the report. · “Not in group”—elements of the selected group will not be included in the report · “Filled”—all rows where this dimension is filled in will be displayed in the report. · “Not filled in” – does the opposite; the report will include only those rows where the value of the selected dimension is not filled in. · “More than”—the report will display only those rows where this measurement is greater than the specified value · “Less than”—the report will display only those rows where this measurement is less than the specified value · “Greater than or equal to”—only those rows will be displayed in the report where this dimension is greater than or equal to the specified value · “Less than or equal to” – the report will display only those rows where this dimension is less than or equal to the specified value · “Contains” – only those rows where this dimension contains the specified substring will be displayed in the report. · “Does not contain”—the report will display only those rows where this dimension does not contain the specified substring. Not all types of comparison are always available. Availability is determined by the measurement type. For example, the "Contains" and "Does not contain" comparison view is only available if the dimension is a string. For example, we want to select all items in the Grocery group:
Just like in the grouping panel, you can add and disable selections. In addition to standard subcontos and additional dimensions, you can add selection by balance and turnover. For example, select only those items where the balance at the end of the year by quantity in debit is greater than one. To do this, add a new selection and select “Quantity of Dt (end balance)”:
Set the comparison type to “More” and the value to 1.
5. Additional panels
5.1. General information
Additionally, you can add three more settings panels: · Additional data · Sorting · Appearance To add them, click on the “Settings panel options” button
And select the desired panels to display
Check the boxes on the required panels and press the “OK” button. Once added, the panel will appear on the right among other panels.
5.2. Additional Data panel
In the Additional Data panel, you can add any additional information to the report. For example, the article number of the nomenclature. To add it, click the familiar add button.
The Select Field window appears.
Just as we selected the measurement, select the “Article” field we need and press the “Ok” button. The selected field will be displayed as standard next to the item grouping, separated by commas.
If we need the field to be displayed in a separate column, then we need to select “In separate columns” from the top of the “Additional data” panel in the placement field.
Then the report will be displayed as follows:
5.3. Sort panel
In the “Sorting” panel, you set the rules by which rows in the report will be sorted. To set rules, click the add button and in the “Select order field” window, select the field or its attribute by which the rows in the report should be sorted. If the entire field is selected, for example “Nomenclature”, then sorting occurs by the main view, that is, in most cases by name. If a specific field attribute is selected, for example, a product item (“Nomenclature.Article”), then sorting occurs by it. For example, in the “Article” field of the item:
Next, you can select the sorting direction: ascending or descending
You can add several fields for sorting, then first the report will be sorted by the first field, and then, if there are several rows with the same value of the first sort field, then these fields will be sorted by the second sort field. For example, if the first sorting is by item number, and then by name, and also in descending order (you could select the entire item, as described above).
Then the sorting will be as follows
That is, first the system sorted the lines by article, and then for those lines where the article coincided, it sorted them by name in reverse order.
5.4. Appearance panel
In this panel you can customize the report display style. The first settings are “Show title” and “Show captions”
The “Display title” checkbox allows you to display the report title and information about sorting and selection.
The “Output signatures” checkbox allows you to display a standard signature.
Next are the design options settings
Here you can choose a ready-made design option for fonts, colors, etc. report from the list:
For example, “Sea” looks like this:
Next comes custom design settings. There are already two settings, but you can add your own:
To disable any setting, uncheck the box next to it. You can also add your own design settings. To do this, press the button. For the settings that appear, you need to fill out three columns: · Fields · Condition · Design In the “Fields” column, we select the fields that we want to format.
The selection of fields to be edited occurs in the “Formable Fields” window.
If we do not select anything, then all fields will be decorated with this setting.
For example, it would be possible to make the font larger for all report columns or just the nomenclature fields. Further, if you need to format not all rows, but only some, then in the “Condition” column you set the condition by which the fields for formatting are selected.
The condition is set in the “Selection” window that appears when editing the condition.
To add a new selection, click on the add button:
A selection will appear. If we select the “New element” item, then we can set a simple selection, such as Nomenclature = Granulated sugar. If we select “New Group”, then we can add a group-connection of two conditions. For example, either Nomenclature = Granulated sugar or Nomenclature in the Products group.
Connections can be “either this or that” (Or) and they can be “both” (And). You can also use a group to make the negation of all conditions included in it (NOT). Using these settings, you can create a fairly complex structure of conditions. In addition to the ability to define groups, further selection is specified in the same way as we defined selection in the “Selection” panel. Next, in the “Design” column, you need to indicate exactly how the fields will be formatted:
Editing the design occurs in the “Editing parameters” window
There are quite a lot of design options: · Background color – sets the background color of the field · Text color – sets the color of the field text · Chart color – sets the color if the report is displayed as a chart · Border color – sets the border that outlines the field · Border style – here you can set how the field border will look: regular line, dotted, double, etc. · Font – sets the font of the field text · Indent – allows you to set the indentation of the text in the field · Auto-indent – allows you to set your own auto-indent, which is done by default by the system in some cases. · Horizontal position – here you can align the text in the field horizontally · Vertical position – here you can align the text in the field vertically. · Placement – allows you to specify a specific setting for how the system will act if the text exceeds the initially set field size. You can, for example, have text that does not fit be moved or simply cut off. · Text orientation – here you can rotate the text by a specified number of degrees. · Format – here you set the output format for values like date, number and Boolean (true, false). We'll talk about the format below. · Highlight negative numbers – allows you to specify whether negative numbers should be highlighted in red or not. · Mark blank – allows you to specify whether the fields where the value is not filled should be underlined with a red dotted line. · Maximum width – here you can limit the maximum possible column width · Minimum width – here you can limit the minimum possible column width More about the “Format” setting: The format is configured in the “Format Row Designer” window. This window has three tabs “Number”, “Date” and “Boolean”, on which you set data presentation formats. You can also specify the language at the top whose regional standards will be applied. Number type settings
On this tab you can specify, for example, the number of decimal places; this is set in the “Precision” field. Or remove the standard division of numbers by digits, that is, so that in nine hundred thousand it is displayed not 900,000, but 900,000. This is done by the “Grouping” checkbox. Date type settings
This tab specifies the date representation. For example, you can specify that the date is displayed not as “05/31/2012”, but as “May 31, 2012”. To do this, you need to specify the appropriate template in the “Local date format” parameter. Templates can also be specified manually. For example, if you set the “MMMM yyyy” template in the “Date Format” parameter, then any May date will be represented as May 2012, and a June date will be represented as June 2012, etc. Boolean type settings (true, false)
Here you can set the representation of the values true (yes) and false (no).
6. Saving and restoring settings
6.1. Preservation
Report settings can be saved for future use by clicking on the “Save report settings” button.
When you click the button, a window for saving the settings will appear:
In this window, you can specify in the “Name” field the name of the setting that you understand, or leave the default one that the system generates. Next, you need to click the “Save” button.
6.2. Recovery
In order to use a previously saved setting, you need to click on the “Load report setting” button:
Next, the “List of Report Options” window appears where you will need to select the setting you are interested in and click “Select”
Once selected, the settings will be loaded from the selected saved option.
6.3. Settings history
By clicking the “History” button you can view and select all the latest report settings. So if you recently set up a report and then changed something, but don’t remember what was there, you can find the old setting here.
7. Data decryption
When you double-click on a field in the report, one of the following actions occurs: If this is a field, some kind of directory, document or other separately created element. Then, when you double-click, a menu appears where you can either open this element or decipher the data on the selected element in the “Account Card” report.
If this field is of a simple type: string, numbers, etc., then the account card will simply open immediately. Author: Andrey Makarov https://andmakarov.blogspot.ru/
Where are the SALT fills?
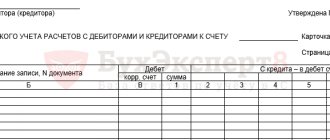
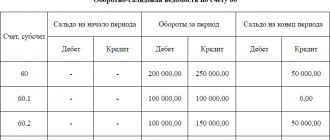
You can download a sample of filling out the balance sheet on our website using the link below. Our experts have prepared for you an example of filling out a statement in Word format, reflecting transactions on account 60 (“Settlements with suppliers and contractors”).
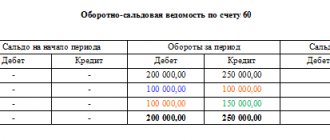
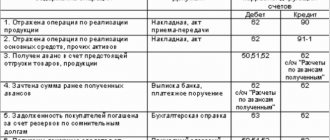
This turnover sheet reflects the following sequence of business transactions:
1. The company transferred to its counterparty an advance payment for goods under a contract in the amount of 100,000 rubles. and reflected this operation as an increase in assets in the debit of active subaccount 60.1. Posting: Dt 60.1 Kt 51 for 100,000 rubles.
2. The counterparty delivered goods to the company under a contract in the amount of 150,000 rubles, and this operation is reflected as an increase in liability in the credit of passive subaccount 60.2. Wiring: Dt 41 Kt 60.2 for RUB 150,000.
3. The company partially pays the counterparty for the goods, and we reflect this transaction as a decrease in liabilities by 100,000 rubles. in the debit of the passive subaccount 60.2 and as a decrease in assets in the credit of subaccount 60.1. Posting: Dt 60.2 Kt 60.1 for 100,000 rubles.
4. As a result, the company owes the counterparty 50,000 rubles, and we record this in the credit of the passive subaccount 60.2, in the credit of the active-passive account 60 as a whole, and also in the final line - as of the end of the reporting period.
Similar statements can be compiled for any accounting account.
How to keep records on account 60 in 1C: Accounting?
Send this article to my email
The material below will be devoted to the issue related to accounting on account 60 in 1C: Accounting 3. Account 60 represents the organization’s settlements with its suppliers and contractors, which in turn has several subaccounts subordinate to it. Account 60 in 1C is used to aggregate data on settlements with counterparties for goods, materials and other valuables, work performed or services rendered.
Those organizations that are engaged in performing work under contracts related to construction work, design and technological work or under a general contract agreement, settlements with subcontractors are also reflected in this account. The account is credited for the amount of accepted goods, services or works that were accepted for accounting. In turn, it is debited for the amounts for the fulfillment of obligations. This also includes advances and prepayments.
Let's set up your 1C. We have been working since 2000. We are among the TOP 10 partners of 1C. Read more →
Analytical accounting for this account should be kept separately, namely in the context of each submitted invoice. In order to view the decryption of the account, you need to go to the “Main” section and select the “Chart of Accounts” item. In the search window, for convenience, you can set the value to “60” and the program will automatically select a list of accounts containing this code. The typical functionality of the program contains the following subaccounts:
Let's look at each of the subaccounts in more detail:
60.01 – used to account for mutual settlements with creditors
60.02 – used to reflect advance payments to suppliers
60.03 – intended to reflect transactions on securities
The last two subaccounts 60.21 and 60.22 are analogues of 60.01 and 60.02, respectively, intended for calculation in foreign currency. And accounts 60.31 and 60.32 are intended for accounting in conventional units. The account is active-passive, as it can contain both receivables and payables.
By clicking on the hyperlink “Accounts for settlements with counterparties” in the header of the account plan list form, the corresponding form will open. Here you can set settlement accounts by organizations, counterparties and contracts.
For example, upon receipt, settlement accounts are specified in the header using the corresponding hyperlink. After which a window will open with the calculation settings.
In order to analyze how accounting is maintained for account 60, you can use the “Account balance sheet” report. This report is located in the “Reports” section of the program. In the header of the report we indicate the required organization, period and account 60.
Please note that subaccounts are also displayed. Let’s go to the list settings by clicking the “Show settings” button. In the settings, the “By subaccounts” checkbox is checked. We will also additionally display a grouping by contracts and settlement documents.
On the “Selection” tab, you can set selection by available fields. Let's reformat the report for the new groupings, after which it will take the following form.
The “Account Analysis” report in the “Reports” section can also be useful, which allows you to display information between the selected account, in our case 60, and all other accounts for the specified period.
Watch video instructions on channel 1C PROGRAMMER EXPERT
EVERYONE MUST DO THEIR JOB! TRUST THE 1C SETUP TO A PROFESSIONAL. MORE →
Discuss the article on the 1C forum?
Where can I download a blank balance sheet form for free?
The balance sheet form is also available to you on our website. You can download it in Excel format, which allows you to make calculations and apply mathematical formulas.
You can get acquainted with the features of compiling turnover for some common accounts in the articles:
- “Features of the balance sheet for account 60”;
- “Features of the balance sheet for account 01.”
Results
The balance sheet is an accounting register, which is an element of the system for collecting and processing information. As a rule, the form is filled out automatically in accounting systems. Using the statement for tax calculation purposes is possible only in special cases. When carrying out transactions that entail different accounting procedures, there is a need to adjust or prepare a new register for tax purposes.
Sources:
Order of the Ministry of Finance of Russia dated December 28, 2001 N 119n
You can find more complete information on the topic in ConsultantPlus. Free trial access to the system for 2 days.